Containerising AI Agents and Workflows
Why Containerise AI Agents?
You've learnt how to run existing containers and build simple images. Now let's apply these skills to real AI workflows. Containerising your AI agents and pipelines gives you three superpowers:
- Isolation -- each agent or service runs in its own clean environment with no dependency conflicts
- Reproducibility -- the same container produces the same results, everywhere, every time
- Deployment -- a containerised agent can run on your laptop, a cloud server, or a Kubernetes cluster with zero code changes
Running Claude Code in a Container (10 minutes)
Difficulty: Intermediate
Claude Code is Anthropic's terminal-based AI coding agent. Running it inside a container gives you a clean, isolated environment where Claude Code can edit files, run commands, and manage your project without affecting your host system.
Quick Start
docker run -it --rm \
  -e ANTHROPIC_API_KEY \
  -v $(pwd):/workspace \
  -w /workspace \
  node:20-slim \
  bash -c "npm install -g @anthropic-ai/claude-code && claude"
This mounts your current directory into the container and starts Claude Code. The -e ANTHROPIC_API_KEY passes your API key from the host environment without embedding it in the command.
A Dedicated Claude Code Container
For regular use, build a purpose-built image. Create a Dockerfile.claude-code:
FROM node:20-slim

# Install system tools that Claude Code may need
RUN apt-get update && \
    apt-get install -y --no-install-recommends \
    git curl python3 python3-pip jq \
    && rm -rf /var/lib/apt/lists/*

# Install Claude Code globally
RUN npm install -g @anthropic-ai/claude-code

# Create a non-root user
RUN useradd --create-home --shell /bin/bash coder
USER coder

WORKDIR /workspace

ENTRYPOINT ["claude"]
Build and run:
# Build the image
docker build -f Dockerfile.claude-code -t claude-code:latest .

# Run Claude Code against your project
docker run -it --rm \
  -e ANTHROPIC_API_KEY \
  -v $(pwd):/workspace \
  claude-code:latest
Multi-Agent Containers
You can run multiple Claude Code instances in parallel, each working on different parts of a codebase. This is useful for large refactoring tasks or when you want agents to work on independent features simultaneously:
# compose.yaml
services:
  agent-backend:
    build:
      dockerfile: Dockerfile.claude-code
    environment:
      - ANTHROPIC_API_KEY
    volumes:
      - ./backend:/workspace
    stdin_open: true
    tty: true

  agent-frontend:
    build:
      dockerfile: Dockerfile.claude-code
    environment:
      - ANTHROPIC_API_KEY
    volumes:
      - ./frontend:/workspace
    stdin_open: true
    tty: true
Costs: Each Claude Code instance uses API credits. Running multiple agents in parallel multiplies your API usage. Check console.anthropic.com for current rates.
Containerising a Python AI Script (20 minutes)
Difficulty: Intermediate
Let's package a real AI workflow: a script that uses Sentence Transformers to generate embeddings from text files.
The Application
Create embed_service.py:
"""A simple embedding microservice using Sentence Transformers."""

from http.server import HTTPServer, BaseHTTPRequestHandler
import json
from sentence_transformers import SentenceTransformer

# Load model once at startup
print("Loading embedding model...")
model = SentenceTransformer("all-MiniLM-L6-v2")
print("Model loaded. Ready to serve requests.")


class EmbeddingHandler(BaseHTTPRequestHandler):
    """Handle POST requests with text to embed."""

    def do_POST(self):
        content_length = int(self.headers.get("Content-Length", 0))
        body = self.rfile.read(content_length)
        data = json.loads(body)

        texts = data.get("texts", [])
        if not texts:
            self.send_response(400)
            self.end_headers()
            self.wfile.write(b'{"error": "No texts provided"}')
            return

        embeddings = model.encode(texts).tolist()

        self.send_response(200)
        self.send_header("Content-Type", "application/json")
        self.end_headers()
        response = json.dumps({
            "embeddings": embeddings,
            "model": "all-MiniLM-L6-v2",
            "dimensions": 384,
            "count": len(embeddings)
        })
        self.wfile.write(response.encode())

    def do_GET(self):
        """Health check endpoint."""
        self.send_response(200)
        self.end_headers()
        self.wfile.write(b'{"status": "healthy"}')


if __name__ == "__main__":
    server = HTTPServer(("0.0.0.0", 8000), EmbeddingHandler)
    print("Embedding service running on port 8000")
    server.serve_forever()
The Dockerfile
FROM python:3.11-slim

# Install system dependencies
RUN apt-get update && \
    apt-get install -y --no-install-recommends gcc && \
    rm -rf /var/lib/apt/lists/*

# Create non-root user
RUN useradd --create-home appuser

WORKDIR /app

# Install Python dependencies (cached layer)
COPY requirements.txt .
RUN pip install --no-cache-dir -r requirements.txt

# Pre-download the model during build (so it's baked into the image)
RUN python -c "from sentence_transformers import SentenceTransformer; SentenceTransformer('all-MiniLM-L6-v2')"

# Copy application code
COPY embed_service.py .

# Switch to non-root user
USER appuser

EXPOSE 8000

# Health check
HEALTHCHECK --interval=30s --timeout=5s --retries=3 \
    CMD python -c "import urllib.request; urllib.request.urlopen('http://localhost:8000')"

CMD ["python", "embed_service.py"]
requirements.txt
sentence-transformers>=3.0.0
torch>=2.3.0
Build and Run
# Build the image
docker build -t embedding-service:1.0 .

# Run it
docker run -d --name embeddings -p 8000:8000 embedding-service:1.0

# Test the health endpoint
curl http://localhost:8000

# Generate embeddings
curl -X POST http://localhost:8000 \
  -H "Content-Type: application/json" \
  -d '{"texts": ["Docker is brilliant", "Containers simplify deployment"]}'
The response will contain 384-dimensional embedding vectors for each input text.
Multi-Agent Containers with Docker Compose (25 minutes)
Difficulty: Intermediate
Real AI systems are rarely a single script. They're composed of multiple services working together. Docker Compose is perfect for this.
Example: RAG Pipeline
Let's build a Retrieval-Augmented Generation (RAG) pipeline with three services:
- Embedding service -- generates vector embeddings from text
- Vector database (ChromaDB) -- stores and searches embeddings
- Query service -- takes a question, finds relevant documents, generates an answer
Project Structure
rag-pipeline/
  compose.yaml
  embedding-service/
    embed_service.py
    requirements.txt
    Dockerfile
  query-service/
    query_service.py
    requirements.txt
    Dockerfile
compose.yaml
services:
  # Embedding service (from our previous example)
  embeddings:
    build: ./embedding-service
    ports:
      - "8001:8000"
    healthcheck:
      test: ["CMD", "python", "-c",
        "import urllib.request; urllib.request.urlopen('http://localhost:8000')"]
      interval: 30s
      timeout: 5s
      retries: 3

  # ChromaDB vector database
  chromadb:
    image: chromadb/chroma:latest
    ports:
      - "8002:8000"
    volumes:
      - chroma-data:/chroma/chroma
    environment:
      ANONYMIZED_TELEMETRY: "false"

  # Query service
  query:
    build: ./query-service
    ports:
      - "8003:8000"
    environment:
      EMBEDDING_URL: http://embeddings:8000
      CHROMA_URL: http://chromadb:8000
      OLLAMA_URL: http://host.docker.internal:11434
    depends_on:
      embeddings:
        condition: service_healthy
      chromadb:
        condition: service_started

volumes:
  chroma-data:
Notice how the services reference each other by name (http://embeddings:8000, http://chromadb:8000). Docker Compose creates a shared network where service names resolve to the correct container IP addresses.
Query Service
Create query-service/query_service.py:
"""Query service: finds relevant documents and generates answers."""

import json
import os
import urllib.request
from http.server import HTTPServer, BaseHTTPRequestHandler

EMBEDDING_URL = os.environ.get("EMBEDDING_URL", "http://embeddings:8000")
CHROMA_URL = os.environ.get("CHROMA_URL", "http://chromadb:8000")
OLLAMA_URL = os.environ.get("OLLAMA_URL", "http://localhost:11434")


def get_embedding(text: str) -> list[float]:
    """Get embedding from the embedding service."""
    data = json.dumps({"texts": [text]}).encode()
    req = urllib.request.Request(
        EMBEDDING_URL,
        data=data,
        headers={"Content-Type": "application/json"},
        method="POST"
    )
    with urllib.request.urlopen(req) as resp:
        result = json.loads(resp.read())
    return result["embeddings"][0]


class QueryHandler(BaseHTTPRequestHandler):
    """Handle RAG queries."""

    def do_POST(self):
        content_length = int(self.headers.get("Content-Length", 0))
        body = self.rfile.read(content_length)
        data = json.loads(body)

        question = data.get("question", "")
        if not question:
            self.send_response(400)
            self.end_headers()
            self.wfile.write(b'{"error": "No question provided"}')
            return

        # Step 1: Embed the question
        embedding = get_embedding(question)

        # Step 2: Search ChromaDB (simplified -- in production, use chromadb client)
        # This shows the pattern; a real implementation would query ChromaDB's API

        response = {
            "question": question,
            "embedding_dimensions": len(embedding),
            "status": "pipeline_connected",
            "services": {
                "embeddings": EMBEDDING_URL,
                "chromadb": CHROMA_URL,
                "ollama": OLLAMA_URL
            }
        }

        self.send_response(200)
        self.send_header("Content-Type", "application/json")
        self.end_headers()
        self.wfile.write(json.dumps(response).encode())

    def do_GET(self):
        self.send_response(200)
        self.end_headers()
        self.wfile.write(b'{"status": "healthy"}')


if __name__ == "__main__":
    server = HTTPServer(("0.0.0.0", 8000), QueryHandler)
    print("Query service running on port 8000")
    server.serve_forever()
Start the Pipeline
cd rag-pipeline

# Build and start all services
docker compose up -d --build

# Check status
docker compose ps

# View logs
docker compose logs -f

# Test the query service
curl -X POST http://localhost:8003 \
  -H "Content-Type: application/json" \
  -d '{"question": "What is Docker?"}'
Scale a Service
Need more embedding throughput? Scale horizontally:
docker compose up -d --scale embeddings=3
This starts three instances of the embedding service. You would add a load balancer in front of them in a production setup.
GPU Passthrough for Local AI Models (10 minutes)
Difficulty: Intermediate
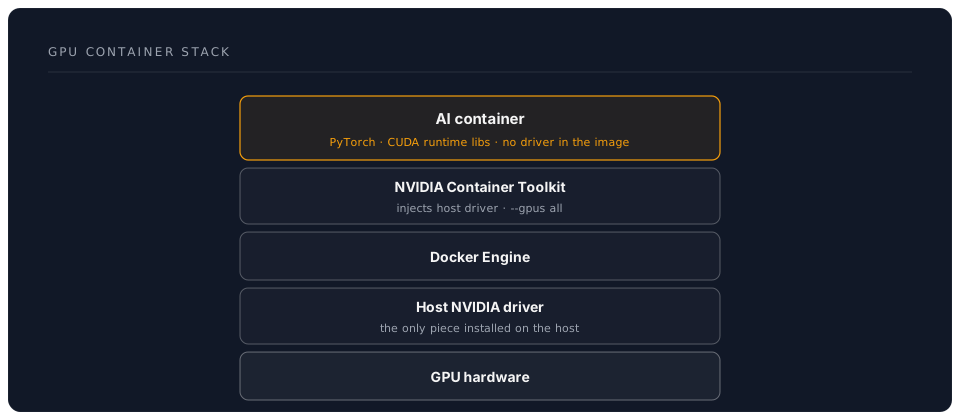
When running AI models that need GPU acceleration, use the NVIDIA Container Toolkit (covered in the Remote Docker section) to pass GPUs through to containers.
Compose with GPU
services:
  ollama:
    image: ollama/ollama:latest
    deploy:
      resources:
        reservations:
          devices:
            - driver: nvidia
              count: 1
              capabilities: [gpu]
    ports:
      - "11434:11434"
    volumes:
      - ollama-data:/root/.ollama

  vllm:
    image: vllm/vllm-openai:latest
    deploy:
      resources:
        reservations:
          devices:
            - driver: nvidia
              count: 1
              capabilities: [gpu]
    ports:
      - "8000:8000"
    command: >
      --model meta-llama/Llama-3.2-3B-Instruct
      --max-model-len 4096

volumes:
  ollama-data:
Note: GPU passthrough requires the NVIDIA Container Toolkit on the host. It works on Linux natively and on Windows via WSL2. macOS does not support NVIDIA GPU passthrough (Apple Silicon uses Metal, which has limited container support).
Security Best Practices (10 minutes)
Difficulty: Intermediate
AI containers often handle sensitive data -- documents, API keys, personal information. Follow these practices to keep your containers secure.
1. Run as Non-Root
Always create and use a non-root user in your Dockerfiles:
RUN useradd --create-home appuser
USER appuser
By default, containers run as root. If an attacker breaks out of your application, they get root access to the container (and potentially the host).
2. Use Read-Only Filesystems
If your container doesn't need to write to disk:
services:
  my-agent:
    image: my-agent:1.0
    read_only: true
    tmpfs:
      - /tmp
3. Manage Secrets Properly
Never put secrets in your Dockerfile or environment variables in compose.yaml files that you commit to Git.
Use Docker secrets (Compose):
services:
  my-agent:
    image: my-agent:1.0
    secrets:
      - api_key

secrets:
  api_key:
    file: ./secrets/api_key.txt
Inside the container, the secret is available at /run/secrets/api_key.
Or use a .env file (not committed to Git):
# .env (add to .gitignore)
OPENAI_API_KEY=sk-abc123...
services:
  my-agent:
    image: my-agent:1.0
    env_file:
      - .env
4. Network Isolation
Only expose ports that need to be public. Use internal networks for service-to-service communication:
services:
  frontend:
    ports:
      - "3000:3000"
    networks:
      - frontend
      - backend

  database:
    # No ports exposed to host
    networks:
      - backend

networks:
  frontend:
  backend:
    internal: true  # Cannot reach the internet
5. Pin Image Versions
Always use specific tags, never latest in production:
# Bad
image: python:latest

# Good
image: python:3.11.9-slim-bookworm
6. Scan Images for Vulnerabilities
# Docker Scout (built into Docker Desktop)
docker scout cves my-agent:1.0

# Or use Trivy (open-source)
docker run --rm aquasec/trivy image my-agent:1.0
Summary
You now know how to:
- Package AI scripts into container images with proper Dockerfiles
- Build multi-service AI pipelines with Docker Compose
- Pass GPUs through to containers for model inference
- Secure your containers with non-root users, secrets management, and network isolation
These patterns are the foundation of production AI systems. Whether you're running a local RAG pipeline or deploying agents to the cloud, containers are the standard way to package and run AI workloads.
Next: Practical Exercises