Remote Docker: Developing on Powerful Machines
The Problem
AI work is computationally demanding. Training models, running inference on large language models, processing datasets -- these tasks need powerful hardware: lots of RAM, fast GPUs, and substantial storage. But powerful hardware is heavy, loud, and expensive to keep on your desk.
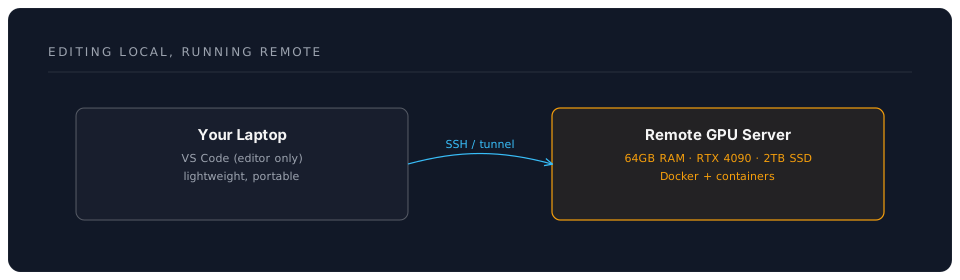
The solution: edit code on your comfortable, portable laptop, but execute it on a powerful remote machine. Docker and VS Code make this surprisingly straightforward.
Option 1: SSH Remote Development (30 minutes)
Difficulty: Intermediate
VS Code can connect directly to a remote machine over SSH and work as if you were sitting in front of it.
Prerequisites
- A remote machine running Linux with Docker installed
- SSH access to that machine (key-based authentication recommended)
- VS Code with the Remote - SSH extension installed
Step 1: Install the Extension
In VS Code, install the Remote - SSH extension (identifier: ms-vscode-remote.remote-ssh). It's part of the same family as the Dev Containers extension.
Step 2: Configure SSH
Ensure you can SSH into your remote machine from the terminal:
ssh your-username@your-server-ip
If this works, VS Code will too. For convenience, add the host to your SSH config:
# ~/.ssh/config
Host gpu-server
    HostName 192.168.1.100
    User your-username
    IdentityFile ~/.ssh/id_ed25519
    ForwardAgent yes
Now you can connect with just ssh gpu-server.
Step 3: Connect from VS Code
- Press
Ctrl+Shift+Pand select "Remote-SSH: Connect to Host..." - Choose
gpu-server(or type the connection string) - VS Code opens a new window connected to the remote machine
- Open a folder on the remote machine
- Everything -- terminal, files, extensions -- runs on the remote server
Step 4: Use Docker on the Remote Machine
Once connected, open the integrated terminal. You're now in a shell on the remote machine:
# Check Docker is available
docker --version

# Run containers on the remote machine's hardware
docker run -d --gpus all \
  --name ollama \
  -v ollama-data:/root/.ollama \
  -p 11434:11434 \
  ollama/ollama

# Pull a large model (uses the server's storage and bandwidth)
docker exec -it ollama ollama pull llama3.3:70b
Step 5: Port Forwarding
VS Code automatically detects when a process listens on a port inside your SSH session and offers to forward it. You can also set up forwarding manually:
- Open the Ports panel (View > Ports)
- Click Forward a Port
- Enter the remote port number (e.g., 11434 for Ollama, 3000 for Open WebUI)
- Access the service at
localhost:<port>in your local browser
This means you can run Ollama and Open WebUI on a powerful remote server but access the chat interface from your laptop's browser at localhost:3000.
Option 2: Docker Context (20 minutes)
Difficulty: Intermediate
Docker Context lets you run Docker commands on your local terminal that execute on a remote machine. You don't need to SSH first -- your local docker CLI talks to the remote Docker daemon directly.
Step 1: Create a Docker Context
# Create a context pointing to your remote server
docker context create gpu-server \
  --docker "host=ssh://your-username@192.168.1.100"

# List available contexts
docker context ls
You'll see something like:
NAME          DESCRIPTION   DOCKER ENDPOINT
default *                   unix:///var/run/docker.sock
gpu-server                  ssh://your-username@192.168.1.100
Step 2: Switch Context
# Use the remote server
docker context use gpu-server

# Now ALL docker commands run on the remote machine
docker ps
docker images
docker run -d --gpus all ollama/ollama
Step 3: Compose on Remote
Docker Compose works with contexts too. With the remote context active:
# This starts the stack on the remote server
docker compose up -d

# View logs from the remote containers
docker compose logs -f
Step 4: Switch Back
# Return to local Docker
docker context use default
Tip: You can also specify the context per-command without switching:
docker --context gpu-server ps
Option 3: VS Code Tunnels (15 minutes)
Difficulty: Beginner
VS Code Tunnels provide a zero-configuration way to connect to a remote machine. No SSH keys, no port forwarding, no firewall rules -- it works through Microsoft's relay service.
Step 1: Install the VS Code CLI on the Remote Machine
SSH into your remote server and install the VS Code CLI:
# Download and install
curl -Lk 'https://code.visualstudio.com/sha/download?build=stable&os=cli-alpine-x64' \
  --output vscode_cli.tar.gz
tar -xf vscode_cli.tar.gz
Step 2: Start the Tunnel
On the remote machine:
./code tunnel
The first time, it will ask you to authenticate with your GitHub or Microsoft account. Follow the URL it provides to authorise the connection.
Once authenticated, you'll see:
Open this link in your browser: https://vscode.dev/tunnel/<machine-name>
Step 3: Connect
You have two options:
- Browser: Open the link in any browser for a full VS Code experience in the browser
- Desktop VS Code: Press
Ctrl+Shift+P> "Remote Tunnels: Connect to Tunnel" and select your machine
Either way, you're now editing and running code on the remote machine with all its hardware.
Running Containers via Tunnel
Once connected, open the terminal and use Docker as normal:
docker run -d --gpus all \
  --name ollama \
  -v ollama-data:/root/.ollama \
  -p 11434:11434 \
  ollama/ollama
Port forwarding works the same as with SSH -- VS Code detects listening ports and offers to forward them.
GPU Passthrough to Containers (15 minutes)
Difficulty: Intermediate
Running AI models in containers on a GPU server requires NVIDIA Container Toolkit, which lets Docker containers access the host's GPU.
Install NVIDIA Container Toolkit (on the remote server)
# Add the NVIDIA repository
curl -fsSL https://nvidia.github.io/libnvidia-container/gpgkey \
  | sudo gpg --dearmor -o /usr/share/keyrings/nvidia-container-toolkit-keyring.gpg

curl -s -L https://nvidia.github.io/libnvidia-container/stable/deb/nvidia-container-toolkit.list \
  | sed 's#deb https://#deb [signed-by=/usr/share/keyrings/nvidia-container-toolkit-keyring.gpg] https://#g' \
  | sudo tee /etc/apt/sources.list.d/nvidia-container-toolkit.list

sudo apt update
sudo apt install -y nvidia-container-toolkit

# Configure Docker to use the NVIDIA runtime
sudo nvidia-ctk runtime configure --runtime=docker
sudo systemctl restart docker
Verify GPU Access
# Run a container with GPU access
docker run --rm --gpus all nvidia/cuda:12.4.1-base-ubuntu22.04 nvidia-smi
You should see your GPU listed in the nvidia-smi output. This confirms containers can access the GPU.
Using GPUs in Compose
services:
  ollama:
    image: ollama/ollama:latest
    deploy:
      resources:
        reservations:
          devices:
            - driver: nvidia
              count: all
              capabilities: [gpu]
    ports:
      - "11434:11434"
    volumes:
      - ollama-data:/root/.ollama

volumes:
  ollama-data:
Practical Example: Local Editing, Remote Execution
Here's a complete workflow combining these techniques.
Scenario
You have a Python script that generates embeddings from a large document collection. It needs a GPU for fast inference but you want to write the code on your laptop.
Step 1: Set Up the Remote Environment
SSH into your server and create a project directory:
ssh gpu-server
mkdir -p ~/projects/embeddings
Step 2: Connect with VS Code
Use Remote-SSH or a Tunnel to connect VS Code to the server. Open ~/projects/embeddings.
Step 3: Create a Dev Container on the Remote Server
Create .devcontainer/devcontainer.json:
{
  "name": "Embeddings Pipeline",
  "image": "mcr.microsoft.com/devcontainers/python:3.11",
  "features": {
    "ghcr.io/devcontainers/features/node:1": {"version": "20"}
  },
  "runArgs": ["--gpus", "all"],
  "postCreateCommand": "pip install torch sentence-transformers pandas tqdm",
  "forwardPorts": [8000],
  "remoteUser": "vscode"
}
The key addition is "runArgs": ["--gpus", "all"], which gives the Dev Container access to the server's GPUs.
Step 4: Reopen in Container
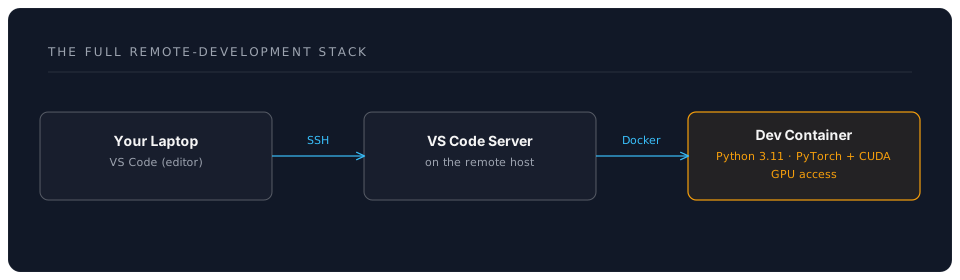
Press Ctrl+Shift+P > "Dev Containers: Reopen in Container". VS Code builds the container on the remote server, giving you a GPU-enabled Python environment.
Step 5: Write and Run
Create your embedding script, run it from the integrated terminal, and it executes on the server's GPU -- while you edit comfortably on your laptop.
The Full Stack
Which Approach Should I Use?
| Approach | Best for | Complexity |
|---|---|---|
| SSH Remote | Dedicated servers you access regularly | Medium |
| Docker Context | Running containers on remote machines from your CLI | Medium |
| VS Code Tunnels | Quick access without SSH configuration | Low |
| Dev Containers + Remote | Full reproducible environments on powerful hardware | Medium-High |
For most AI development, SSH Remote + Dev Containers is the gold standard. You get reproducibility, GPU access, and the comfort of your own editor.