VS Code Dev Containers: Reproducible Environments
What Are Dev Containers?
Imagine clicking a single button and getting a fully configured development environment -- the right programming language, the right tools, the right extensions, all pre-installed and ready to use. That's what VS Code Dev Containers give you.
A Dev Container is a Docker container specifically configured as a development environment. VS Code connects to the container and runs your editor inside it. Your code, your terminal, your debugging tools -- everything runs in the container. But the VS Code window itself still appears on your desktop, feeling completely native.
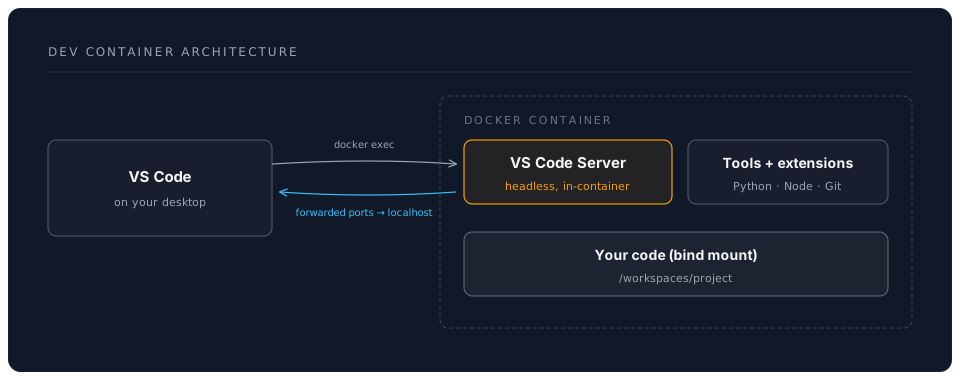
Why This Matters
- Everyone gets the same environment. Share a
.devcontainerfolder with your team and everyone has identical tooling -- no more "it works on my machine." - No installation clutter. Your host machine stays clean. Python, Node, Rust, Go -- they all live in containers, not polluting your system.
- Instant onboarding. New team member? Clone the repo, open in VS Code, click "Reopen in Container." Done.
- Disposable and reproducible. Broken something? Rebuild the container. It takes seconds.
Installing the Dev Containers Extension (5 minutes)
Prerequisites
- VS Code installed (see the Phase 1 Foundations workshop)
- Docker Desktop running (see previous section)
Install the Extension
- Open VS Code
- Press
Ctrl+Shift+X(Windows/Linux) orCmd+Shift+X(macOS) to open Extensions - Search for "Dev Containers"
- Install the extension published by Microsoft (identifier:
ms-vscode-remote.remote-containers)
You'll see a new green icon in the bottom-left corner of VS Code. This is the Remote Indicator -- it shows whether you're connected to a container, a remote host, or your local machine.
Verify Docker Connection
Press Ctrl+Shift+P (or Cmd+Shift+P) and type "Dev Containers: Show Log". If you see Docker version information, the extension is communicating with Docker correctly.
Your First Dev Container (20 minutes)
Difficulty: Beginner
Let's create a Dev Container for a Python AI project.
Step 1: Create a Project
mkdir ~/my-ai-project && cd ~/my-ai-project
Create a simple Python file called hello.py:
"""Quick test to verify the Dev Container is working."""

import sys
import platform

print(f"Python version: {sys.version}")
print(f"Platform: {platform.platform()}")
print(f"Architecture: {platform.machine()}")
print("Dev Container is working!")
Step 2: Create the Dev Container Configuration
Create a .devcontainer directory with a devcontainer.json file:
mkdir .devcontainer
Create .devcontainer/devcontainer.json:
{
  "name": "AI Development",
  "image": "mcr.microsoft.com/devcontainers/python:3.11",

  "features": {
    "ghcr.io/devcontainers/features/node:1": {
      "version": "20"
    },
    "ghcr.io/devcontainers/features/git:1": {},
    "ghcr.io/devcontainers/features/github-cli:1": {}
  },

  "customizations": {
    "vscode": {
      "extensions": [
        "ms-python.python",
        "ms-python.vscode-pylance",
        "charliermarsh.ruff",
        "ms-toolsai.jupyter"
      ],
      "settings": {
        "python.defaultInterpreterPath": "/usr/local/bin/python",
        "editor.formatOnSave": true
      }
    }
  },

  "postCreateCommand": "pip install --upgrade pip",

  "forwardPorts": [8000, 8080],

  "remoteUser": "vscode"
}
Let's break this down:
| Field | Purpose |
|---|---|
name | Friendly name shown in VS Code |
image | The base Docker image for the container |
features | Additional tools to install (Node, Git, GitHub CLI) |
customizations.vscode.extensions | VS Code extensions to install inside the container |
customizations.vscode.settings | VS Code settings for this project |
postCreateCommand | Commands to run after the container is created |
forwardPorts | Ports to automatically forward from container to host |
remoteUser | The user to run as inside the container |
Step 3: Open in the Dev Container
- Open the
my-ai-projectfolder in VS Code - VS Code should detect the
.devcontainerfolder and show a notification: "Folder contains a Dev Container configuration file. Reopen folder to develop in a container." - Click "Reopen in Container"
Alternatively, press Ctrl+Shift+P and select "Dev Containers: Reopen in Container".
VS Code will:
- Build (or pull) the container image
- Install the specified features
- Install the VS Code extensions inside the container
- Run the
postCreateCommand - Connect your editor to the container
The first time takes a few minutes. Subsequent reopens are much faster because Docker caches the layers.
Step 4: Verify
Open the integrated terminal in VS Code (Ctrl+`` ) and run:
python hello.py
You should see output confirming you're running Python 3.11 inside a Linux container, regardless of what OS your laptop runs.
Check the installed tools:
node --version    # Node 20.x
git --version     # Git 2.x
gh --version      # GitHub CLI
Adding Python Dependencies (10 minutes)
Difficulty: Beginner
Most AI projects need specific Python packages. There are several ways to handle this in a Dev Container.
Option 1: postCreateCommand
For simple projects, install packages after the container is created:
{
  "postCreateCommand": "pip install torch transformers pandas numpy"
}
Option 2: requirements.txt (Recommended)
Create a requirements.txt in your project root:
torch>=2.3.0
transformers>=4.40.0
pandas>=2.2.0
numpy>=1.26.0
sentence-transformers>=3.0.0
Then reference it in devcontainer.json:
{
  "postCreateCommand": "pip install -r requirements.txt"
}
Option 3: Custom Dockerfile
For more control, use a Dockerfile as the base instead of a pre-built image.
Create .devcontainer/Dockerfile:
FROM mcr.microsoft.com/devcontainers/python:3.11

# Install system-level dependencies
RUN apt-get update && apt-get install -y \
    ffmpeg \
    libsndfile1 \
    && rm -rf /var/lib/apt/lists/*

# Install Python packages
COPY requirements.txt /tmp/
RUN pip install --no-cache-dir -r /tmp/requirements.txt
Update devcontainer.json to use the Dockerfile:
{
  "name": "AI Development",
  "build": {
    "dockerfile": "Dockerfile",
    "context": ".."
  }
}
The context: ".." means the build context is the project root (one level up from .devcontainer/), so the Dockerfile can access requirements.txt.
Dev Container Features (10 minutes)
Difficulty: Intermediate
Features are reusable, shareable units of installation logic. Instead of writing Dockerfile commands to install common tools, you add a feature and it handles everything.
Browse available features at containers.dev/features.
Commonly Useful Features for AI Work
{
  "features": {
    "ghcr.io/devcontainers/features/python:1": {
      "version": "3.11"
    },
    "ghcr.io/devcontainers/features/node:1": {
      "version": "20"
    },
    "ghcr.io/devcontainers/features/rust:1": {
      "version": "latest"
    },
    "ghcr.io/devcontainers/features/docker-in-docker:2": {},
    "ghcr.io/devcontainers/features/git:1": {},
    "ghcr.io/devcontainers/features/github-cli:1": {},
    "ghcr.io/devcontainers/features/common-utils:2": {
      "installZsh": true
    }
  }
}
Docker-in-Docker: The
docker-in-dockerfeature lets you run Docker commands inside your Dev Container. Useful if your AI workflow involves building or running containers as part of the development process.
Adding Claude Code to a Dev Container
Claude Code is a terminal-based AI coding agent from Anthropic. Since it's installed via npm, you can add it to any Dev Container that has Node.js. Add it to your postCreateCommand:
{
  "name": "AI Development with Claude Code",
  "image": "mcr.microsoft.com/devcontainers/python:3.11",
  "features": {
    "ghcr.io/devcontainers/features/node:1": {"version": "20"},
    "ghcr.io/devcontainers/features/git:1": {},
    "ghcr.io/devcontainers/features/github-cli:1": {}
  },
  "postCreateCommand": "npm install -g @anthropic-ai/claude-code && pip install -r requirements.txt",
  "remoteUser": "vscode"
}
Once the container builds, you can run claude from the integrated terminal. Claude Code reads your project's CLAUDE.md file for context and can edit files, run commands, and manage your codebase -- all from within the container. This means every team member gets the same AI-assisted development experience, configured identically.
API key required: Claude Code needs an Anthropic API key. Set this via a
.envfile or pass it as a container environment variable (see the Security section in the AI Containers chapter for best practices on managing secrets in containers).
Port Forwarding (5 minutes)
Difficulty: Beginner
When you run a web server or API inside a Dev Container, you need port forwarding to access it from your browser on the host machine.
Automatic Forwarding
List ports in devcontainer.json:
{
  "forwardPorts": [8000, 8080, 11434]
}
VS Code automatically forwards these ports when the container starts. Access them at localhost:<port> on your host machine.
On-Demand Forwarding
If a process starts listening on a port that isn't pre-configured, VS Code detects it and offers to forward it. You'll see a notification in the bottom-right corner.
You can also manage forwarded ports manually in the Ports panel (View > Ports, or Ctrl+Shift+P > "Ports: Focus on Ports View").
Example: Full AI Dev Container (15 minutes)
Difficulty: Intermediate
Here's a complete Dev Container setup for a serious AI development project with Python, Node, Claude Code, Ollama access, and Jupyter notebooks.
.devcontainer/devcontainer.json:
{
  "name": "DreamLab AI Dev",
  "image": "mcr.microsoft.com/devcontainers/python:3.11",

  "features": {
    "ghcr.io/devcontainers/features/node:1": {"version": "20"},
    "ghcr.io/devcontainers/features/git:1": {},
    "ghcr.io/devcontainers/features/github-cli:1": {},
    "ghcr.io/devcontainers/features/common-utils:2": {
      "installZsh": true,
      "configureZshCompletion": true
    }
  },

  "customizations": {
    "vscode": {
      "extensions": [
        "ms-python.python",
        "ms-python.vscode-pylance",
        "charliermarsh.ruff",
        "ms-toolsai.jupyter",
        "ms-toolsai.vscode-jupyter-cell-tags",
        "redhat.vscode-yaml",
        "esbenp.prettier-vscode",
        "streetsidesoftware.code-spell-checker"
      ],
      "settings": {
        "python.defaultInterpreterPath": "/usr/local/bin/python",
        "editor.formatOnSave": true,
        "[python]": {
          "editor.defaultFormatter": "charliermarsh.ruff"
        }
      }
    }
  },

  "postCreateCommand": "npm install -g @anthropic-ai/claude-code && pip install torch transformers sentence-transformers pandas numpy jupyter chromadb",

  "forwardPorts": [8000, 8080, 8888, 11434],

  "remoteUser": "vscode",

  "mounts": [
    "source=devcontainer-ai-models,target=/home/vscode/.cache/huggingface,type=volume"
  ]
}
The mounts section creates a persistent volume for Hugging Face model downloads, so you don't have to re-download models every time you rebuild the container. The postCreateCommand installs Claude Code globally and all Python dependencies, so the environment is ready for AI work the moment it finishes building.
Using It
- Save the file in your project's
.devcontainer/directory - Open the project in VS Code
- Click "Reopen in Container"
- Once inside, run
claudein the terminal to start Claude Code, orjupyter notebook --ip 0.0.0.0for Jupyter - Open
localhost:8888in your browser for Jupyter notebooks
You now have a complete, reproducible AI development environment -- with Claude Code, Jupyter, and the full Python AI stack -- that anyone on your team can use by cloning the repo.
Troubleshooting
| Problem | Solution |
|---|---|
| "Cannot connect to Docker" | Ensure Docker Desktop is running |
| Build is very slow | Check your internet connection; first builds download base images |
| Extensions not installing | Rebuild the container: Ctrl+Shift+P > "Dev Containers: Rebuild Container" |
| Port not accessible | Check the Ports panel; ensure the port is forwarded |
| Container runs out of disk | Increase Docker Desktop's disk limit in Settings > Resources |
| Python packages missing after rebuild | Move pip install to the Dockerfile rather than postCreateCommand for caching |