Chapter 3: Practical Exercises — Sharpen Your Visual Version Control Skills
30 Minutes to Cement Your New Skills
These exercises progress from basic to advanced, reinforcing the Mermaid diagramming and Git version control skills from the hands-on session. Complete them in order for maximum learning.
Exercise 1: Mermaid Flowchart from Description (5 minutes)
Objective
Translate a written process into a professional flowchart without any diagramming software.
Difficulty: Beginner
Scenario
Your manager sends you this email:
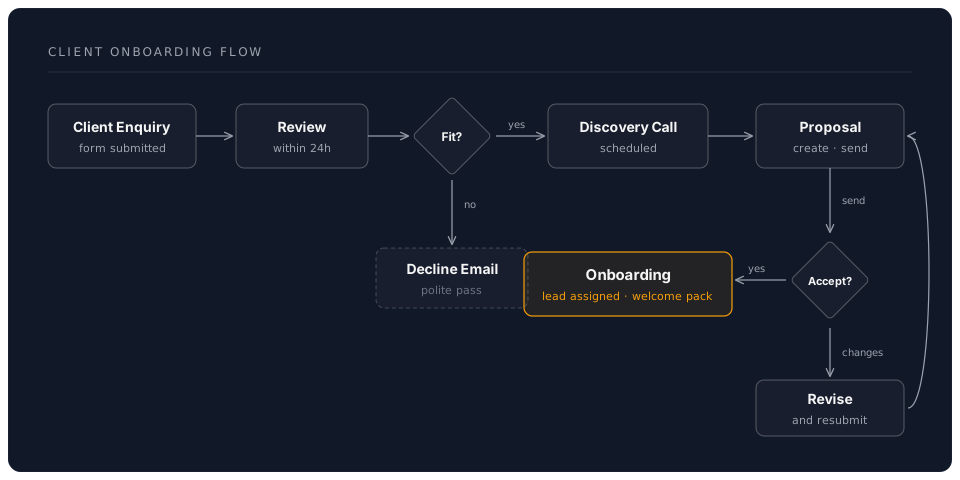
"We need to document our client onboarding process. New clients fill in an enquiry form. We review it within 24 hours. If they qualify, we schedule a discovery call. If not, we send a polite decline email. After the discovery call, we create a proposal. The client either accepts (we begin onboarding) or requests changes (we revise and resubmit). Once accepted, we assign a project lead and send a welcome pack."
Steps
-
Create a new file:
exercises/onboarding-flow.md -
Write the Mermaid flowchart based on the description above. Start with:
flowchart TD A([Client Enquiry]) --> B[Review Application] B --> C{Qualifies?} -
Complete the diagram by adding all remaining steps, decisions, and connections
-
Preview your diagram: right-click the file and select "Open Preview" (or
Ctrl+Shift+V) -
Refine: Add styling to highlight the happy path:
style G fill:#4fc3f7,stroke:#01579b,stroke-width:3px
Expected Result
A complete flowchart with at least 8 nodes, 2 decision diamonds, and clear paths for all outcomes.
Reflection
- How long would this take in PowerPoint or Visio?
- What happens when the process changes — how easy is it to update?
Hint: Complete Solution
Exercise 2: Project Gantt Chart (5 minutes)
Objective
Create a realistic project timeline using Mermaid Gantt chart syntax.
Difficulty: Beginner to Intermediate
Scenario
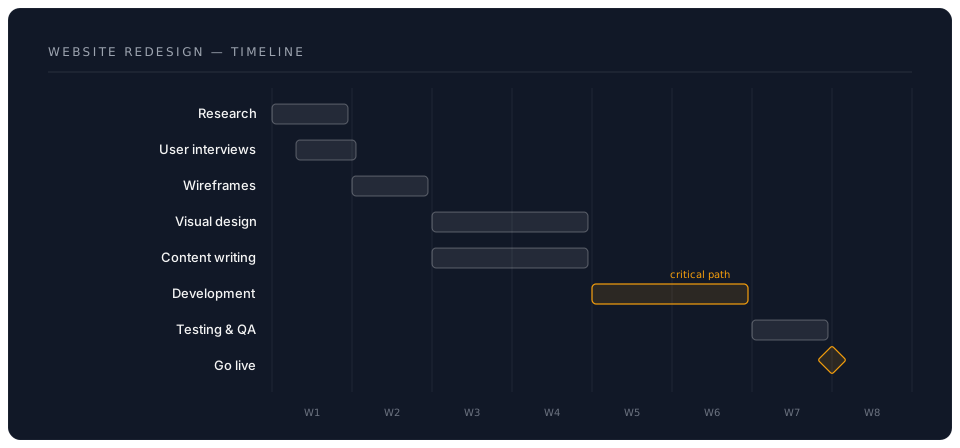
You're managing a 6-week website redesign project with these phases:
| Phase | Duration | Dependencies |
|---|---|---|
| Discovery & Research | 1 week | None (starts immediately) |
| User Interviews | 5 days | Starts during week 1 |
| Wireframes | 1 week | After research complete |
| Visual Design | 2 weeks | After wireframes |
| Content Writing | 2 weeks | Starts with visual design |
| Development | 2 weeks | After visual design |
| Testing | 1 week | After development |
| Launch | 1 day | After testing |
Steps
-
Create file:
exercises/project-timeline.md -
Build the Gantt chart:
gantt title Website Redesign Project dateFormat YYYY-MM-DD section Discovery Research & Analysis :done, d1, 2026-07-01, 7d User Interviews :active, d2, 2026-07-03, 5d -
Add remaining sections: Design, Content, Development, and Launch
-
Use status markers:
done,active,crit(critical path), or leave blank for future tasks -
Preview and verify the timeline makes sense
Expected Result
A complete Gantt chart showing all 8 tasks across 4 sections with proper dependencies.
Hint: Complete Solution
Reflection
- How would you update this when timelines shift?
- What advantage does text-based diagramming have over drag-and-drop tools?
Exercise 3: Git Workflow Practice (7 minutes)
Objective
Execute a complete Git workflow using VS Code's visual tools — from initial commit through branching and merging.
Difficulty: Intermediate
Steps
-
Initialise a new repository:
- Create a folder:
exercises/my-documentation-project/ - Open it in VS Code
- Open Source Control panel (
Ctrl+Shift+G) - Click "Initialize Repository"
- Create a folder:
-
Create your first file and commit:
- Create
README.mdwith:# My Documentation Project A version-controlled documentation repository. ## Contents - Project overview (this file) - In Source Control panel, click
+to stage the file - Type commit message:
docs: initial project setup with README - Click the tick icon (or press
Ctrl+Enter) to commit
- Create
-
Create a feature branch:
- Click the branch name in the bottom-left status bar (it says
main) - Select "Create new branch..."
- Name it:
feature/add-process-diagram - Confirm you're now on the new branch
- Click the branch name in the bottom-left status bar (it says
-
Add content on the branch:
- Create
process-diagram.mdwith a Mermaid flowchart of any process you choose - Stage and commit:
feat: add process workflow diagram
- Create
-
Switch back to main and merge:
- Click the branch name again, switch to
main - Open terminal (
Ctrl+``):git merge feature/add-process-diagram` - Verify the merge succeeded — your diagram file should now be on
main
- Click the branch name again, switch to
-
View your history in GitLens:
- Open the GitLens Commit Graph (
Ctrl+Shift+P> "GitLens: Show Commit Graph") - See both commits and the branch/merge structure
- Open the GitLens Commit Graph (
Success Criteria
- Repository initialised with at least 2 commits
- Feature branch created and merged
- Commit graph shows the branch structure
- All commit messages follow conventional format
Reflection
- How does this compare to saving files as "v1", "v2", "v3"?
- When would you create a branch in your real work?
Exercise 4: Sequence Diagram for a Real Workflow (6 minutes)
Objective
Document a real interaction or approval process from your work using a Mermaid sequence diagram.
Difficulty: Intermediate
Scenario
Choose ONE of these scenarios (or use your own):
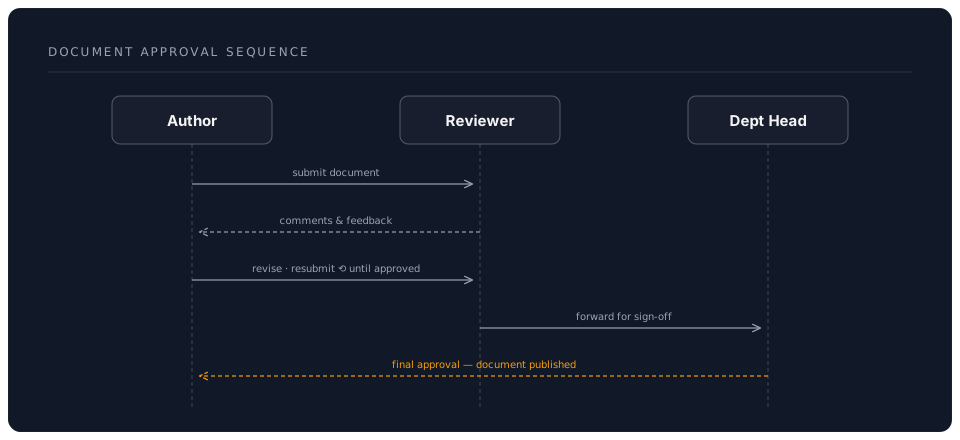
Option A — Document Approval: An author submits a document to a reviewer. The reviewer either approves it or sends comments. If comments are sent, the author revises and resubmits. Once approved, the document goes to the department head for final sign-off.
Option B — Expense Claim: An employee submits an expense claim through a web portal. The system validates the amount. Claims under 100 pounds are auto-approved. Claims over 100 pounds go to a manager. The manager approves or rejects. Approved claims are sent to finance for payment.
Steps
-
Create file:
exercises/workflow-sequence.md -
Write the sequence diagram. Here's a starter for Option A:
sequenceDiagram participant Author participant Reviewer participant Head as Dept Head Author->>Reviewer: Submit document -
Add all interactions including:
- Alternative paths (use
alt/elseblocks) - Loop for revision cycles (use
loop) - Notes for important details (use
Note over)
- Alternative paths (use
-
Preview and verify the flow matches the scenario
-
Commit your work: Stage and commit with message
feat: add workflow sequence diagram
Hint: Option A Complete Solution
Reflection
- How many people in your organisation could benefit from seeing this diagram?
- What processes in your work would be clearer as sequence diagrams?
Exercise 5: Full Documentation Mini-Project (7 minutes)
Objective
Combine everything: create a multi-file, diagram-rich, version-controlled documentation project.
Difficulty: Advanced
Steps
-
Create project structure:
exercises/team-handbook/ ├── README.md ├── onboarding/ │ └── process.md ├── workflows/ │ └── project-lifecycle.md └── tools/ └── recommended-stack.md -
README.md — Write a brief handbook introduction with a Mermaid mind map showing the handbook sections:
mindmap root((Team Handbook)) Onboarding New starter process First week checklist Workflows Project lifecycle Approval gates Tools Recommended stack Setup guides -
onboarding/process.md — Create a flowchart showing the new starter journey (first day through to first month)
-
workflows/project-lifecycle.md — Create a Gantt chart showing a typical project lifecycle for your team
-
tools/recommended-stack.md — List recommended tools with a Mermaid graph showing how they connect
-
Version-control the entire project:
- Initialise a Git repo (if not already in one)
- Commit each file separately with meaningful messages:
docs: add team handbook structure and READMEdocs: add onboarding process flowchartdocs: add project lifecycle Gantt chartdocs: add recommended tools overview
-
Push to GitHub (optional but recommended):
- Create a new repository on GitHub
- Push your local repository:
git remote add origin https://github.com/YOUR-USERNAME/team-handbook.git
git push -u origin main
Success Criteria
- 4 files created, each containing at least one Mermaid diagram
- 4 separate commits with conventional commit messages
- Diagrams render correctly in preview
- Project structure is logical and navigable
- (Stretch) Pushed to GitHub and visible on your profile
Reflection
- How long did this take compared to creating the same content in Word/PowerPoint?
- Could you hand this to a colleague and have them continue your work?
- What would you add to make this a real team resource?
Exercise Summary
| Exercise | Skill Practised | Difficulty | Time |
|---|---|---|---|
| 1. Onboarding Flowchart | Mermaid flowcharts | Beginner | 5 min |
| 2. Project Gantt Chart | Mermaid Gantt charts | Beginner–Intermediate | 5 min |
| 3. Git Workflow | Branching, merging, committing | Intermediate | 7 min |
| 4. Sequence Diagram | Mermaid sequences, real scenarios | Intermediate | 6 min |
| 5. Full Mini-Project | All skills combined | Advanced | 7 min |
Patterns You've Practised
The Diagram-from-Description Pattern
Written description --> Identify actors & steps --> Mermaid syntax --> Preview & refine
The Feature Branch Pattern
Create branch --> Make changes --> Commit --> Merge back to main
The Documentation Project Pattern
Plan structure --> Create files with diagrams --> Commit each piece --> Push to GitHub
Common Mistakes to Avoid
- Mermaid syntax errors: Check for missing arrows (
-->not->) and proper node IDs (no spaces in IDs) - Forgetting to stage: Files must be staged before committing — look for the
+icon - Vague commit messages: "update" tells you nothing in 6 months; "docs: add onboarding flowchart" tells the whole story
- Not previewing diagrams: Always check the rendered output before committing
- One massive commit: Commit logical units separately for clean history
Pro Tips from the Exercises
- Start simple, then refine — get the basic diagram working before adding styling
- Use the Mermaid Live Editor (https://mermaid.live/) for complex diagrams — it gives instant feedback
- Commit early and often — small commits are easier to understand and revert
- Read your Git history — use GitLens to review what you've built; it reinforces the workflow
- Ask Claude Code to generate Mermaid — describe what you want in plain English and let AI draft the syntax