Chapter 3: The Core Git Workflow
⏱️ Time: 30 minutes | 🎯 Difficulty: 🟢 Beginner
With your environment configured, this chapter introduces the fundamental Git workflow — the daily cycle of making changes, recording them, and sharing them. These commands are the ones you will use most often, and mastering them is the single most important skill in this workshop.
3.1 Cloning a Repository
Cloning creates a local copy of an existing repository on your machine, including all files and their complete history.
Steps to Clone
-
Find the Repository URL:
- On GitHub, navigate to the repository page.
- Click the green "<> Code" button.
- Copy the URL. Use the SSH tab if you set up SSH keys in Chapter 2a, or the HTTPS tab otherwise.
-
Clone Using the Command Line:
git clone git@github.com:yourusername/your-repo.gitOr with HTTPS:
git clone https://github.com/yourusername/your-repo.git -
Open in VS Code:
cd your-repo code . -
Clone Using VS Code (Alternative):
- Open VS Code and select "Clone Git Repository..." from the welcome screen (or press
Ctrl+Shift+P/Cmd+Shift+Pand search "Git: Clone"). - Paste the repository URL and press Enter.
- Choose a local folder and click "Open" when prompted.
- Open VS Code and select "Clone Git Repository..." from the welcome screen (or press
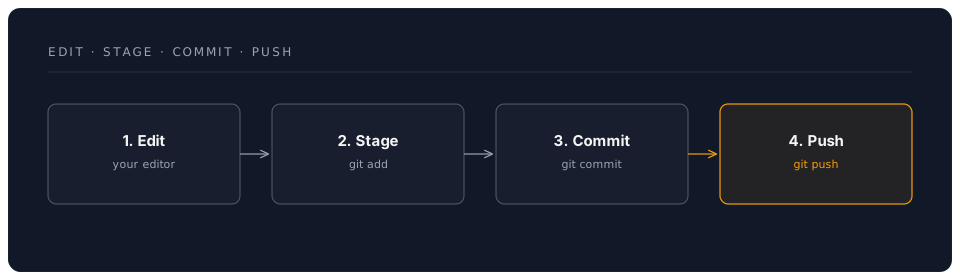
3.2 The Core Cycle: Edit, Stage, Commit, Push
This is the heart of everyday Git usage. Think of it as a four-step rhythm:
Step 1: Edit Your Files
Make changes to your project files using VS Code (or any editor). Git is watching your working directory and knows which files have been modified.
Step 2: Check What Has Changed
Before staging, review what Git has detected:
git status
This shows you:
- Modified files — files that exist in the repository but have been changed.
- Untracked files — new files Git has not seen before.
- Staged files — files ready to be committed (shown in green).
💡 Tip: Run
git statusfrequently. It is your compass — it tells you exactly where you are in the workflow.
You can also see the specific changes within files:
git diff
This shows a line-by-line comparison of what has changed since the last commit.
Step 3: Stage Your Changes
Staging tells Git which changes you want to include in your next commit. This is an intentional step — it gives you control over exactly what gets recorded.
# Stage a specific file
git add index.html

# Stage multiple specific files
git add index.html styles/main.css

# Stage all changes in the current directory and below
git add .
📝 Note:
git add .stages everything. This is convenient but can accidentally include files you did not intend to commit (such as.envfiles or large binaries). For important commits, stage files individually.
Step 4: Commit Your Changes
A commit records a snapshot of your staged changes with a descriptive message:
git commit -m "Add navigation bar to home page"
Writing good commit messages matters. Your future self (and collaborators) will rely on them to understand what changed and why.
Good commit messages:
Add responsive navigation menu
Fix broken link on about page
Update team photos for 2026
Remove unused CSS from footer styles
Poor commit messages:
fix stuff
update
asdfgh
changes
💡 Tip: Write commit messages in the imperative mood ("Add feature" not "Added feature"). Think of each message as completing the sentence: "If applied, this commit will..."
Step 5: Push to GitHub
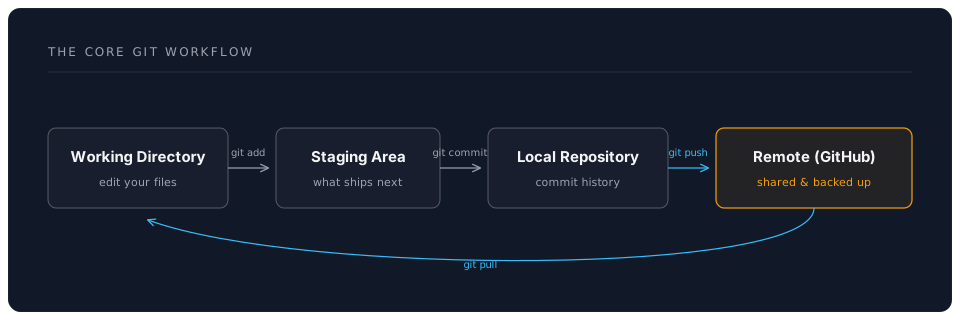
Upload your local commits to the remote repository on GitHub:
git push
If this is the first push for a new branch:
git push -u origin main
The -u flag sets up tracking between your local branch and the remote branch, so future pushes only need git push.
Step 6: Pull Changes from GitHub
If you (or a collaborator) have made changes on GitHub that are not yet on your local machine:
git pull
This fetches the latest changes from the remote and merges them into your current branch.
⚠️ Important: Always pull before you push if you are working on a shared repository. This prevents conflicts and rejected pushes.
3.3 Essential Git Commands Reference
| Command | Description |
|---|---|
git status | Shows current changes, staged files, and untracked files |
git add <file> | Stages a specific file for commit |
git add . | Stages all changes in the current directory |
git commit -m "message" | Records staged changes with a descriptive message |
git push | Uploads local commits to the remote repository |
git pull | Fetches and merges remote changes into your local branch |
git log | Displays commit history |
git log --oneline | Displays commit history in a compact single-line format |
git diff | Shows unstaged changes (what you have modified but not yet staged) |
git diff --staged | Shows staged changes (what will be included in the next commit) |
The Git Workflow Diagram
3.4 Branching Basics
Branches let you work on new features or experiments without affecting the main codebase. Think of them as parallel timelines for your project.
Creating and Switching Branches
# Create a new branch and switch to it
git checkout -b my-new-feature

# Switch back to main
git checkout main

# List all branches (the asterisk marks your current branch)
git branch
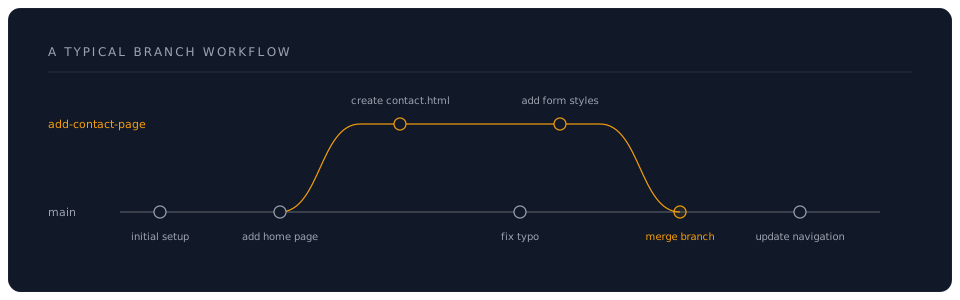
A Typical Branch Workflow
-
Create a branch for your work:
git checkout -b add-contact-page -
Make your changes, stage, and commit as normal:
# ... edit files ... git add contact.html styles/contact.css git commit -m "Add contact page with form" -
Push the branch to GitHub:
git push -u origin add-contact-page -
Merge back to main when the work is complete:
git checkout main git merge add-contact-page git push -
Delete the branch (optional, keeps things tidy):
git branch -d add-contact-page
💡 Tip: For collaborative projects, merging is usually done via a Pull Request on GitHub rather than a local
git merge. This allows others to review your changes before they are incorporated. See Chapter 4 for details.
3.5 The .gitignore File
Not everything in your project directory should be tracked by Git. The .gitignore file tells Git which files and directories to ignore.
Create a .gitignore file in your project root:
# Dependencies
node_modules/

# Environment variables (NEVER commit these)
.env
.env.local
.env.*.local

# Build output
dist/
build/

# Operating system files
.DS_Store
Thumbs.db

# Editor settings (usually personal preference)
.vscode/settings.json

# API keys and credentials
*.key
credentials.json
⚠️ Critical: Always add
.envto your.gitignorebefore making your first commit. If you accidentally commit a file containing API keys, the key is in your Git history even if you delete the file later. See Chapter 2c for more on this.
3.6 Using VS Code's Git Integration
VS Code has excellent built-in Git support that provides a visual alternative to the command line.
The Source Control Panel
Click the branch icon in the Activity Bar (or press Ctrl+Shift+G / Cmd+Shift+G) to open the Source Control panel. Here you can:
- See modified files — they appear in the "Changes" section.
- Stage files — click the
+icon next to a file to stage it (equivalent togit add). - Unstage files — click the
-icon next to a staged file. - Write commit messages — type your message in the input box at the top and click the tick icon (or press
Ctrl+Enter/Cmd+Enter). - Push and pull — use the
...menu or the sync button in the status bar.
Viewing Diffs
Click any modified file in the Source Control panel to see a side-by-side diff showing exactly what has changed.
The Status Bar
The bottom-left of VS Code shows your current branch name. Click it to switch branches or create new ones.
3.7 Guided Exercise: Your First Git Project
Practise the complete Git workflow from scratch:
1. Create a Project Folder and Initialise Git:
mkdir ~/my-first-project
cd ~/my-first-project
git init
2. Create Your First File:
# Create a README.md file
echo "# My First Git Project" > README.md
echo "" >> README.md
echo "This is my first project managed with Git." >> README.md
3. Stage and Commit:
git add README.md
git commit -m "Initial commit: add README"
4. Make a Change and Commit Again:
Open README.md in VS Code and add a line:
## About
This project demonstrates the core Git workflow.
git add README.md
git commit -m "Add about section to README"
5. Create a Branch, Make Changes, and Merge:
git checkout -b add-hello-page
echo "<h1>Hello, World!</h1>" > hello.html
git add hello.html
git commit -m "Add hello page"
git checkout main
git merge add-hello-page
6. View Your History:
git log --oneline
You should see three commits. In VS Code, use Git Graph to visualise the branch and merge.
7. (Optional) Push to GitHub:
Create a new repository on GitHub (click the + icon > "New repository"), then:
git remote add origin git@github.com:yourusername/my-first-project.git
git push -u origin main
🎯 Knowledge Check
Before moving forward, ensure you can answer:
- What is the difference between
git addandgit commit? - What does
git statusshow you? - Why should you pull before you push on a shared repository?
- What goes in a
.gitignorefile? - What is a branch, and why would you use one?
Answers:
git addstages changes (selects them for the next commit);git commitrecords the staged changes as a permanent snapshot.- Which files have been modified, which are staged for commit, and which are untracked.
- To incorporate any changes made by collaborators, preventing conflicts and rejected pushes.
- Patterns for files and directories that Git should ignore — typically dependencies, build output, environment variables, and OS-specific files.
- A branch is a parallel line of development. You use branches to work on features or experiments without affecting the main codebase.