AI Coding Assistants Integration
Learning Objectives
- Master multiple AI coding assistants in VS Code
- Understand when to use each AI tool and why
- Configure Claude Code, GitHub Copilot, and Continue.dev for maximum productivity
- Implement privacy-conscious AI workflows
- Build custom AI-powered development environments
- Integrate local and cloud AI models
The AI Landscape in VS Code (2026)
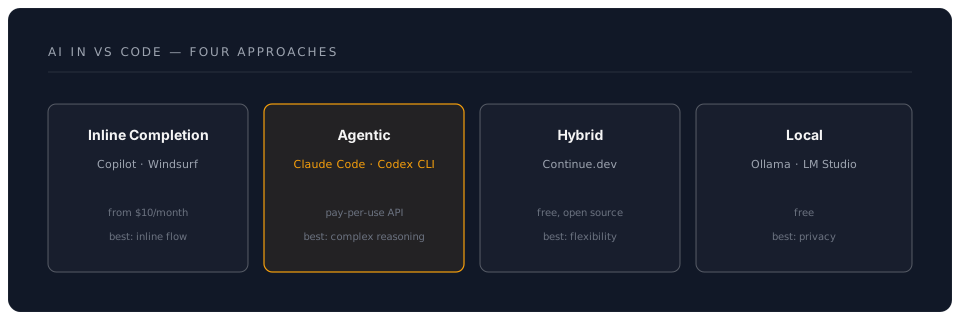
GitHub Copilot (Inline Completion Standard)
Installation & Setup
code --install-extension GitHub.copilot
code --install-extension GitHub.copilot-chat
Authentication:
1. Click Copilot icon in status bar
2. Sign in with GitHub account
3. Authorise VS Code
4. Subscription required (from $10/month, free for students/OSS maintainers)
5. Check github.com/features/copilot for current plans
Core Features
1. Inline Code Completion
How it works:
// Start typing or write a comment:
// Function to calculate fibonacci sequence

// Copilot suggests:
function fibonacci(n) {
  if (n <= 1) return n;
  return fibonacci(n - 1) + fibonacci(n - 2);
}

// Press Tab to accept
// Or Ctrl+→ to accept word-by-word
Trigger Suggestions:
- Type function name → Suggestions appear
- Write comment → Implementation suggested
- Start pattern → Continuation suggested
Navigate Suggestions:
Alt+] → Next suggestion
Alt+[ → Previous suggestion
Tab → Accept suggestion
Ctrl+→ → Accept next word
Esc → Dismiss
2. Copilot Chat
Open Chat:
Ctrl+I → Inline chat
Or: Sidebar → Copilot Chat icon
Chat Commands:
@workspace → Include workspace context
/explain → Explain selected code
/fix → Fix problems in code
/tests → Generate tests
/doc → Generate documentation
/clear → Clear chat history
Example Workflow:
1. Select complex function
2. Ctrl+I
3. Type: "/explain in simple terms"
4. Copilot explains the code
5. Type: "/tests with edge cases"
6. Copilot generates tests
3. Generate Tests
// Select this function:
function validateEmail(email) {
  const regex = /^[^\s@]+@[^\s@]+\.[^\s@]+$/;
  return regex.test(email);
}

// Right-click → "Copilot: Generate Tests"
// Or: Ctrl+I → "/tests"

// Copilot generates:
describe('validateEmail', () => {
  it('should return true for valid email', () => {
    expect(validateEmail('test@example.com')).toBe(true);
  });

  it('should return false for invalid email', () => {
    expect(validateEmail('invalid')).toBe(false);
  });

  it('should handle email with subdomain', () => {
    expect(validateEmail('user@mail.company.com')).toBe(true);
  });
});
4. Documentation Generation
# Select function:
def calculate_discount(price, discount_percent, is_member):
    if is_member:
        discount_percent += 5
    return price * (1 - discount_percent / 100)

# Ctrl+I → "/doc"

# Copilot adds:
def calculate_discount(price, discount_percent, is_member):
    """
    Calculate the final price after applying a discount.

    Args:
        price (float): The original price of the item
        discount_percent (float): The discount percentage to apply
        is_member (bool): Whether the customer is a member (adds 5% extra discount)

    Returns:
        float: The final price after discount

    Example:
        >>> calculate_discount(100, 10, True)
        85.0
    """
    if is_member:
        discount_percent += 5
    return price * (1 - discount_percent / 100)
Copilot Configuration
{
  // Enable/disable Copilot
  "github.copilot.enable": {
    "*": true,
    "yaml": false,
    "plaintext": false,
    "markdown": false
  },

  // Inline suggestions
  "github.copilot.editor.enableAutoCompletions": true,

  // Advanced
  "github.copilot.advanced": {
    "debug.overrideEngine": "default",
    "debug.testOverrideProxyUrl": "",
    "debug.overrideProxyUrl": ""
  }
}
Claude Code (Agentic Terminal Assistant)
What is Claude Code?
Claude Code is Anthropic's agentic coding tool. Unlike traditional editor extensions, it runs in your terminal and operates on your entire codebase — reading files, making edits, running commands, and reasoning through complex multi-step tasks. It works brilliantly inside VS Code's integrated terminal.
Installation & Setup
# Install globally
npm install -g @anthropic-ai/claude-code

# Set your API key
export ANTHROPIC_API_KEY="sk-ant-..."   # from console.anthropic.com

# Start a session in your project
cd your-project
claude
Also available as: desktop app (Mac/Windows), web app (claude.ai/code), and IDE extensions (VS Code, JetBrains).
Core Features
1. Agentic Codebase Interaction
Claude Code reads your project structure, understands context, and makes changes directly:
You: "Add input validation to all API endpoints in src/routes/"

Claude Code:
1. Scans src/routes/ to find all endpoint files
2. Analyses existing patterns
3. Adds Zod validation schemas
4. Updates each route handler
5. Shows you a diff of every change
2. Terminal Integration
# Run Claude Code in VS Code terminal (Ctrl+`)
claude

# Or give it a one-shot task
claude "explain the authentication flow in this project"
claude "find and fix the bug causing test failures"
3. Project Configuration (CLAUDE.md)
Create a CLAUDE.md file in your project root to give Claude Code persistent context:
# Project Context
This is a React + Express application.
Use TypeScript strict mode. Follow ESLint rules.
Tests use Vitest. Run `npm test` to verify changes.
4. Slash Commands and Workflows
/fast         → Switch to faster model for quick tasks
/compact      → Summarise conversation to save context
/init         → Generate a CLAUDE.md for your project
/review       → Review code changes
5. MCP Server Integration
Claude Code supports the Model Context Protocol (MCP), allowing it to connect to external tools, databases, and services as context sources.
6. Subagents
For complex tasks, Claude Code can spawn focused subagents that work on specific subtasks in parallel, then synthesise the results.
When to Use Claude Code
Complex refactoring across many files    → Claude Code
Understanding unfamiliar codebase        → Claude Code
Multi-step tasks (build feature + tests) → Claude Code
Quick inline completion while typing     → Use Copilot instead
Configuration
Cost: Pay-per-use via the Anthropic API. Powered by Claude Opus by default; use /fast for quicker, cheaper responses with Claude Sonnet. Also included with the Max subscription plan. Check console.anthropic.com for current rates.
Continue.dev (Flexible & Open Source)
Installation
code --install-extension Continue.continue
Why Continue?
Advantages:
- Free and fully open-source
- Connect any model: Claude, GPT, Gemini, Ollama (local), and more
- Tab autocomplete with configurable models
- Full code context awareness with
@references - Local model support for complete privacy
- Customisable system prompts and slash commands
Configuration
Access Config:
Ctrl+Shift+P → "Continue: Open config.json"
Multi-Model Setup (2026):
{
  "models": [
    {
      "title": "Claude Sonnet 4.6",
      "provider": "anthropic",
      "model": "claude-sonnet-4-6",
      "apiKey": "sk-ant-..."
    },
    {
      "title": "GPT-4o",
      "provider": "openai",
      "model": "gpt-4o",
      "apiKey": "sk-..."
    },
    {
      "title": "Gemini 2.5 Flash",
      "provider": "gemini",
      "model": "gemini-2.5-flash",
      "apiKey": "AIza..."
    },
    {
      "title": "Local Llama 3",
      "provider": "ollama",
      "model": "llama3:8b"
    }
  ],
  "tabAutocompleteModel": {
    "title": "Codestral",
    "provider": "ollama",
    "model": "codestral:latest"
  },
  "embeddingsProvider": {
    "provider": "ollama",
    "model": "nomic-embed-text"
  }
}
Features
1. Chat with Context
Open Chat:
Ctrl+L → Open Continue chat
Add Context:
@file → Reference specific file
@folder → Reference entire folder
@code → Reference selected code
@docs → Search documentation
@web → Search web
Example:
You: "Refactor @file UserController.ts to use async/await instead of promises"

Continue: Shows refactored code with explanations
2. Inline Editing
Quick Edit:
1. Select code
2. Ctrl+I
3. Type instruction
4. Continue modifies code inline
Example:
// Select this:
function getUserData(userId) {
  return fetch(`/api/users/${userId}`)
    .then(res => res.json())
    .catch(err => console.error(err));
}

// Ctrl+I → "Convert to async/await with error handling"

// Result:
async function getUserData(userId) {
  try {
    const res = await fetch(`/api/users/${userId}`);
    return await res.json();
  } catch (err) {
    console.error('Failed to fetch user data:', err);
    throw err;
  }
}
3. Model Selection
Switch Models Mid-Chat:
1. In chat, click model dropdown
2. Select different model
3. Previous context maintained
When to use which model:
Claude Sonnet/Opus: Complex reasoning, refactoring, documentation
GPT-4o: General coding, analysis
Gemini: Research, large context windows
Local (Ollama): Privacy, offline work, cost-free iteration
4. Slash Commands
/edit → Edit selected code
/comment → Add comments
/share → Share chat
/cmd → Generate shell command
Local AI with Ollama
Setup Ollama
Install Ollama:
# macOS/Linux
curl -fsSL https://ollama.com/install.sh | sh

# Windows
# Download from ollama.com
Install Models:
# Code completion
ollama pull codestral
ollama pull qwen2.5-coder:7b

# Chat
ollama pull llama3:8b
ollama pull mistral:7b

# Embeddings (for context)
ollama pull nomic-embed-text
Verify:
ollama list
# Should show installed models
Configure Continue for Ollama
{
  "models": [
    {
      "title": "Llama 3 8B",
      "provider": "ollama",
      "model": "llama3:8b"
    },
    {
      "title": "Qwen 2.5 Coder",
      "provider": "ollama",
      "model": "qwen2.5-coder:7b"
    }
  ],
  "tabAutocompleteModel": {
    "title": "Codestral",
    "provider": "ollama",
    "model": "codestral:latest"
  }
}
Benefits:
- ✅ Complete privacy (no data leaves your machine)
- ✅ Works offline
- ✅ No usage costs
- ✅ Customisable models
Requirements:
- 16GB+ RAM
- GPU recommended (NVIDIA, Apple Silicon)
- ~10GB disk space per model
Other Notable AI Tools (2026)
Cursor AI
A VS Code fork with AI deeply integrated into every interaction. If you want AI built into the editor itself rather than added via extensions, Cursor is worth evaluating.
Type: Standalone editor (VS Code fork)
Cost: From $20/month
Best for: Developers who want AI-native editing
Website: cursor.com
Windsurf (formerly Codeium)
AI coding assistant with inline completions and chat, positioned as a more affordable Copilot alternative.
Type: VS Code extension + standalone editor
Cost: From $10-15/month (free tier available)
Best for: Budget-conscious developers wanting inline AI
Aider
Free, open-source terminal-based AI pair programmer. Like Claude Code, it runs in the terminal and makes direct edits to your files.
Type: Terminal tool (open-source)
Cost: Free (bring your own API key)
Best for: Open-source enthusiasts, terminal-first developers
Website: aider.chat
OpenAI Codex CLI
OpenAI's open-source terminal coding agent, similar in concept to Claude Code.
Type: Terminal tool (open-source)
Cost: Free (uses OpenAI API)
Best for: Developers already using OpenAI APIs
Repository: github.com/openai/codex
Choosing Your AI Stack
There is no single "best" tool — the strongest approach combines complementary tools:
| Need | Recommended Tool |
|---|---|
| Inline completions while typing | GitHub Copilot |
| Complex multi-file tasks | Claude Code |
| Flexible model switching | Continue.dev |
| Complete privacy (offline) | Ollama + Continue |
| AI-native editor experience | Cursor |
AI-Powered Workflows
Workflow 1: Feature Development
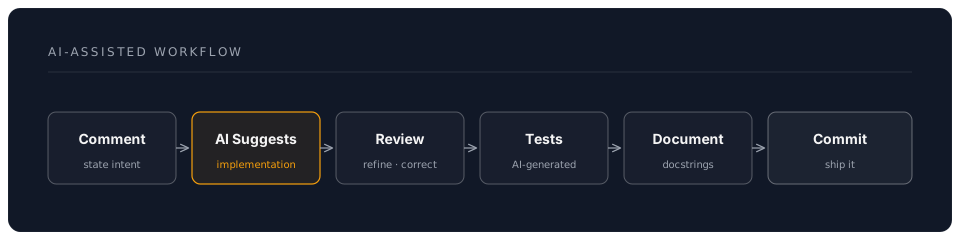
Steps:
1. Write function signature + comment
   // Function to validate user registration data

2. Accept Copilot inline suggestion (Tab)

3. Refine with Claude Code (in terminal):
   claude "add phone number validation to the registration function"

4. Generate tests with Copilot Chat:
   Ctrl+I → "/tests with edge cases"

5. Add docs:
   Ctrl+I → "/doc in JSDoc format"

6. Commit with AI-generated message:
   In Source Control, click the sparkle icon for Copilot commit message
Workflow 2: Code Review
1. Select unfamiliar code
2. Ctrl+I → "/explain"
3. Ask follow-ups in chat
4. Request improvements: "How can this be optimized?"
5. Apply suggestions
Workflow 3: Bug Fixing
1. In Claude Code terminal: paste the error message or describe the bug
2. Claude Code reads the relevant files and diagnoses the issue
3. It proposes and applies a fix directly
4. Or use Continue chat: Ctrl+L → "Why am I getting this error? @file ErrorComponent.tsx"
5. Generate test to prevent regression
Workflow 4: Learning New Technology
1. Continue chat: "How do I use React hooks for state management?"
2. Get explanation
3. "Show me an example with @code MyComponent"
4. Modify example for your use case
5. "Add error handling"
6. Iterate until working
Privacy & Security
Data Handling by Provider
| Provider | Data Sent | Retained | Training | Privacy |
|---|---|---|---|---|
| GitHub Copilot | Code snippets | For debugging only | No* | Medium |
| Claude Code (API) | Code + prompts | Not used for training by default | No (see data policy) | Medium-High |
| Continue (Cloud) | Code + prompts | Varies by model provider | Depends on API provider | Medium |
| Continue (Ollama) | Nothing | All local | Optional | High |
*GitHub states they do not train on your code for Copilot Business/Enterprise plans. Check current policies for individual plans.
Best Practices
For Sensitive Code:
// Disable AI for specific files/folders
{
  "github.copilot.enable": {
    "*": true,
    "**/.env": false,
    "**/secrets/**": false,
    "**/config/credentials.ts": false
  }
}
Use .copilotignore:
# .copilotignore
.env
.env.*
secrets/
config/api-keys.json
Local-First Setup:
// Use Ollama for maximum privacy
{
  "models": [
    {
      "title": "Local Only",
      "provider": "ollama",
      "model": "codellama:13b"
    }
  ]
}
Pro Tips
Tip 1: Context is Everything
Bad: "Fix this function"
Good: "Refactor @file UserService.ts to use dependency injection pattern, ensuring compatibility with @file DIContainer.ts"
Tip 2: Iterative Refinement
Don't expect perfect code first time:
1. Get initial suggestion
2. Refine: "Add error handling"
3. Refine: "Add logging"
4. Refine: "Add type safety"
5. Now it's production-ready
Tip 3: Use Multiple AI Tools Together
Copilot: Quick inline completions while typing
Claude Code: Complex multi-file tasks, agentic workflows
Continue: Flexible model switching, inline chat
Local (Ollama): Sensitive code, offline work
Tip 4: Custom Instructions
Create .continuerc.json in project:
{
  "systemMessage": "You are an expert in React, TypeScript, and Node.js. Always provide type-safe solutions with error handling. Follow the project's ESLint config."
}
Tip 5: Keyboard Shortcuts
// keybindings.json
[
  {
    "key": "ctrl+shift+a",
    "command": "github.copilot.generate"
  },
  {
    "key": "ctrl+shift+c",
    "command": "continue.continueGUIView.focus"
  },
  {
    "key": "ctrl+shift+e",
    "command": "continue.sendMainUserInput",
    "args": "/explain"
  }
]
Common Pitfalls
Pitfall 1: Blindly Accepting Suggestions
Problem: AI suggestions may have bugs or security issues Solution: Always review AI-generated code
✅ Do:
- Read every line
- Test thoroughly
- Check for security issues
- Verify logic

❌ Don't:
- Tab through without reading
- Trust AI for security-critical code
- Skip testing
Pitfall 2: Over-Reliance on AI
Problem: Not learning fundamentals Solution: Use AI as a teacher, not a crutch
Instead of: "Write entire authentication system"
Do: "Explain JWT authentication flow"
Then: Implement yourself, using AI for specific parts
Pitfall 3: Privacy Leaks
Problem: Sending API keys/secrets to AI Solution: Disable AI in sensitive files
{
  "github.copilot.enable": {
    "**/.env": false,
    "**/secrets": false
  }
}
Pitfall 4: Conflicting AI Tools
Problem: Multiple autocomplete tools fighting Solution: Choose one primary autocomplete
Either: Copilot autocomplete
Or: Continue autocomplete
Or: Cody autocomplete
Not all three at once!
Pitfall 5: Not Providing Context
Problem: Generic, unhelpful responses Solution: Use @ mentions and context
Bad: "How do I handle errors?"
Good: "How should I handle errors in @file PaymentService.ts following the pattern in @file ErrorHandler.ts?"
Assessment
Knowledge Check
Question 1: What is the difference between GitHub Copilot, Claude Code, and Continue.dev?
Answer
- **Copilot**: Closed-source extension, from $10/month, best inline code completion, deep GitHub integration - **Claude Code**: Standalone terminal agent, pay-per-use API, best for complex multi-file reasoning and agentic tasks - **Continue.dev**: Open-source extension, free, supports multiple models (including local via Ollama), most flexible and customisableQuestion 2: How do you prevent AI from seeing sensitive code?
Answer
1. Disable AI for specific patterns in settings 2. Create .copilotignore file 3. Use local AI (Ollama) for sensitive projects 4. Review settings: `github.copilot.enable` with file patternsQuestion 3: When should you use local AI vs cloud AI?
Answer
**Local (Ollama):** - Sensitive/proprietary code - Offline work - No ongoing costs - Have GPU/16GB+ RAMCloud:
- Need latest/best models
- Limited hardware
- Quick setup
- Collaborative work
Practical Exercise
Build an AI-Enhanced Feature:
-
Setup:
- Install Copilot or Continue
- Configure for your language
-
Develop Feature:
- Write comment describing feature
- Accept AI suggestion
- Refine with chat
-
Generate Tests:
- Use
/testscommand - Add edge cases manually
- Use
-
Document:
- Generate docs with
/doc - Review and improve
- Generate docs with
-
Review:
- Explain code to yourself
- Ask AI to review
- Apply suggestions
Success Criteria:
- Working, tested feature
- Complete documentation
- No security issues
- You understand every line
Next Steps
Master AI integration! Next:
- Advanced Editing: Advanced editing with AI
- Remote Development: Remote AI workflows
Additional Resources
- GitHub Copilot Docs
- Claude Code Documentation
- Continue.dev Documentation
- Ollama Models
- Aider Documentation
- Cursor AI
Estimated Time: 4-5 hours Difficulty: Intermediate to Advanced Prerequisites: Introduction through Settings & Customisation, coding experience