Remote Development (SSH, Containers, WSL)
Learning Objectives
- Connect to remote servers via SSH and edit code seamlessly
- Develop inside Docker containers for consistent environments
- Use Windows Subsystem for Linux (WSL) from VS Code
- Understand Remote-Tunnels for accessing your machine from anywhere
- Configure remote development workflows
- Troubleshoot common remote development issues
The Remote Development Revolution
Traditional Development:
Code locally → Deploy to server → Test → Debug → Repeat
Remote Development:
Code directly on server/container → Live testing → Instant feedback
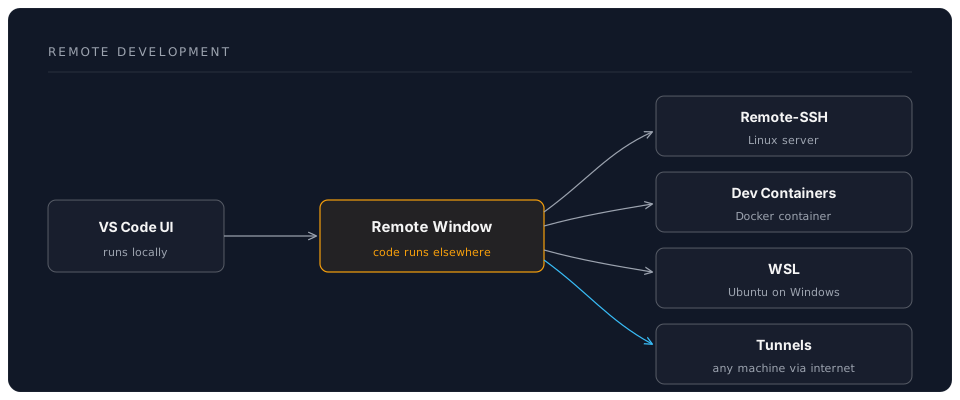
Remote - SSH
Installation
code --install-extension ms-vscode-remote.remote-ssh
code --install-extension ms-vscode-remote.remote-ssh-edit
Setup SSH Connection
Step 1: Configure SSH Config File
# Create/edit SSH config
code ~/.ssh/config
Add server configuration:
Host production-server
    HostName 192.168.1.100
    User ubuntu
    Port 22
    IdentityFile ~/.ssh/id_rsa

Host aws-dev
    HostName ec2-xxx.compute.amazonaws.com
    User ec2-user
    IdentityFile ~/.ssh/aws-key.pem

Host github-codespace
    HostName your-codespace.github.dev
    User codespace
    ForwardAgent yes
Step 2: Connect
1. Ctrl+Shift+P → "Remote-SSH: Connect to Host"
2. Select server from list (or type new)
3. Select platform (Linux/macOS/Windows)
4. VS Code opens new window connected to server
Status Bar Indicator:
Bottom left shows: "><" SSH: production-server
Working Remotely
Once Connected:
- File Explorer shows remote filesystem
- Terminal runs on remote server
- Extensions run remotely
- Editing happens on remote files
Open Folder on Remote:
File → Open Folder → Navigate remote filesystem
Or: Ctrl+K Ctrl+O
Best Practices:
1. Install extensions on remote (they don't auto-sync)
2. Use absolute paths in settings
3. Configure remote git credentials
4. Set up port forwarding for web apps
Port Forwarding
Access remote web servers locally:
1. App runs on remote: http://localhost:3000
2. VS Code detects port
3. Notification: "Forward Port 3000"
4. Click "Forward"
5. Access locally: http://localhost:3000
Manual Port Forwarding:
1. Ports view (beside Terminal)
2. Click "Forward a Port"
3. Enter port number
4. Access via localhost
Configuration:
// .vscode/settings.json on remote
{
  "remote.autoForwardPorts": true,
  "remote.portsAttributes": {
    "3000": {
      "label": "Frontend Dev Server",
      "onAutoForward": "notify"
    },
    "5000": {
      "label": "Backend API",
      "onAutoForward": "openBrowser"
    }
  }
}
SSH Configuration
Advanced SSH Config:
Host jump-box
    HostName bastion.example.com
    User admin
    IdentityFile ~/.ssh/id_rsa

Host internal-server
    HostName 10.0.1.50
    User developer
    ProxyJump jump-box
    IdentityFile ~/.ssh/internal-key
    ServerAliveInterval 60
    ServerAliveCountMax 3
VS Code Remote Settings:
{
  "remote.SSH.remotePlatform": {
    "production-server": "linux",
    "aws-dev": "linux"
  },
  "remote.SSH.showLoginTerminal": true,
  "remote.SSH.connectTimeout": 60,
  "remote.SSH.enableAgentForwarding": true
}
Dev Containers
Installation
code --install-extension ms-vscode-remote.remote-containers
Prerequisites:
- A container runtime installed and running (see options below)
Container Runtime Options
Docker Desktop remains the most common choice, but several alternatives have matured:
| Runtime | Platform | Cost | Notes |
|---|---|---|---|
| Docker Desktop | Windows, macOS, Linux | Free for personal/small business, paid for enterprise | Most widely used, easiest setup |
| Podman Desktop | Windows, macOS, Linux | Free (open-source) | Daemonless, rootless by default, Docker-compatible CLI |
| Rancher Desktop | Windows, macOS, Linux | Free (open-source) | Includes both containerd and dockerd, built-in Kubernetes |
| Colima | macOS, Linux | Free (open-source) | Lightweight, CLI-only, uses Lima VMs on macOS |
For Dev Containers specifically, Docker Desktop or Podman Desktop are the most straightforward choices. VS Code's Dev Containers extension works with any Docker-API-compatible runtime.
Creating a Dev Container
Method 1: From Template
1. Ctrl+Shift+P → "Dev Containers: Add Dev Container Configuration Files"
2. Select template (Node, Python, Go, etc.)
3. Select options (Node version, etc.)
4. Reopen in container
Method 2: Custom Dockerfile
Create .devcontainer/devcontainer.json:
{
  "name": "My Full-Stack App",
  "dockerComposeFile": "docker-compose.yml",
  "service": "app",
  "workspaceFolder": "/workspace",

  "customizations": {
    "vscode": {
      "extensions": [
        "dbaeumer.vscode-eslint",
        "esbenp.prettier-vscode",
        "eamodio.gitlens",
        "github.copilot"
      ],
      "settings": {
        "terminal.integrated.defaultProfile.linux": "bash",
        "editor.formatOnSave": true
      }
    }
  },

  "forwardPorts": [3000, 5000],
  "postCreateCommand": "npm install",
  "remoteUser": "node"
}
Create .devcontainer/Dockerfile:
FROM node:22-bookworm

# Install additional tools
RUN apt-get update && apt-get install -y \
    git \
    curl \
    vim \
    && rm -rf /var/lib/apt/lists/*

# Install global npm packages
RUN npm install -g typescript tsx nodemon

# Set up user
ARG USERNAME=node
RUN usermod -s /bin/bash $USERNAME

# Set working directory
WORKDIR /workspace
Create .devcontainer/docker-compose.yml:
version: '3.8'

services:
  app:
    build:
      context: .
      dockerfile: Dockerfile
    volumes:
      - ../..:/workspace:cached
    command: sleep infinity
    network_mode: service:db
    environment:
      - DATABASE_URL=postgresql://postgres:password@localhost:5432/myapp

  db:
    image: postgres:15
    restart: unless-stopped
    volumes:
      - postgres-data:/var/lib/postgresql/data
    environment:
      POSTGRES_PASSWORD: password
      POSTGRES_DB: myapp

volumes:
  postgres-data:
Opening in Container
Method 1: Reopen
Ctrl+Shift+P → "Dev Containers: Reopen in Container"
Method 2: Open Folder
File → Open Folder → Select folder with .devcontainer
VS Code prompts: "Reopen in Container"
Status Indicator:
Bottom left: "><" Dev Container: My Full-Stack App
Container Features
Access Running Services:
- PostgreSQL on localhost:5432 (inside container)
- Web app on localhost:3000 (forwarded)
Terminal in Container:
Ctrl+` → Opens bash in container
All commands run in container environment
Install Extensions:
Extensions installed in container persist
Synced via devcontainer.json
Dev Container Templates
Node.js Full-Stack:
{
  "name": "Node.js & PostgreSQL",
  "dockerComposeFile": "docker-compose.yml",
  "service": "app",
  "workspaceFolder": "/workspace",
  "forwardPorts": [3000, 5432],
  "postCreateCommand": "npm install && npm install -g @anthropic-ai/claude-code",
  "customizations": {
    "vscode": {
      "extensions": [
        "dbaeumer.vscode-eslint",
        "esbenp.prettier-vscode",
        "eamodio.gitlens",
        "GitHub.copilot",
        "ms-azuretools.vscode-docker"
      ]
    }
  }
}
Python Data Science:
{
  "name": "Python 3 & Jupyter",
  "image": "mcr.microsoft.com/vscode/devcontainers/python:3.12",
  "postCreateCommand": "pip install -r requirements.txt",
  "customizations": {
    "vscode": {
      "extensions": [
        "ms-python.python",
        "ms-toolsai.jupyter",
        "ms-python.vscode-pylance",
        "Continue.continue"
      ]
    }
  }
}
Windows Subsystem for Linux (WSL)
Installation
code --install-extension ms-vscode-remote.remote-wsl
Setup WSL (Windows):
# Install WSL 2
wsl --install

# Or install specific distro
wsl --install -d Ubuntu-24.04

# Set default version
wsl --set-default-version 2
Opening WSL Folder
Method 1: From Windows
1. Ctrl+Shift+P → "WSL: Open Folder in WSL"
2. Select distro
3. Navigate to folder
Method 2: From WSL Terminal
# In WSL terminal
cd ~/projects/myapp
code .
Status Indicator:
Bottom left: "><" WSL: Ubuntu-24.04
WSL Best Practices
File Performance:
✅ Store files in WSL filesystem (/home/user/projects)
❌ Access Windows files from WSL (/mnt/c/Users/...)

Why: WSL filesystem is 10-100x faster
Git Configuration:
# Configure Git in WSL separately
git config --global user.name "Your Name"
git config --global user.email "you@example.com"

# Use credential helper
git config --global credential.helper "/mnt/c/Program\ Files/Git/mingw64/bin/git-credential-manager-core.exe"
VS Code Settings for WSL:
{
  "remote.WSL.fileWatcher.polling": false,
  "remote.WSL.debug": false
}
Remote Tunnels
What are Tunnels?
Access your machine from anywhere without SSH setup:
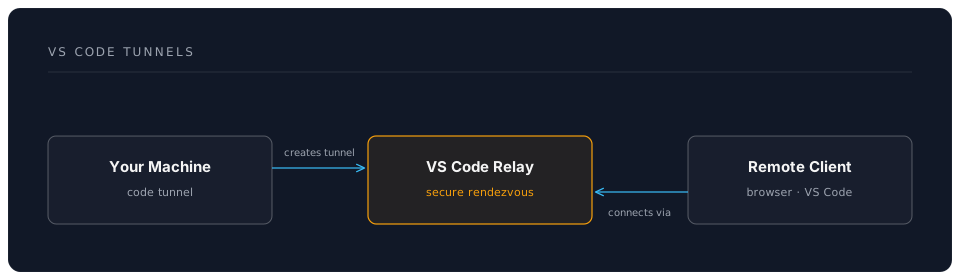
Setup Tunnel
On Your Machine:
# Install VS Code CLI
code --version  # Verify installed

# Create tunnel
code tunnel

# First time: Sign in with GitHub/Microsoft
# Choose name for this machine: "my-desktop"
Access from Anywhere:
1. Open vscode.dev
2. Sign in with same account
3. See "my-desktop" in Remote Explorer
4. Click to connect
Or use desktop VS Code:
1. Install Remote - Tunnels extension
2. Ctrl+Shift+P → "Remote-Tunnels: Connect to Tunnel"
3. Select your machine
Tunnel Use Cases
Perfect for:
- Accessing home dev machine from anywhere
- No port forwarding/firewall config needed
- Working on iPad/Chromebook via browser
- Collaborative debugging
Not ideal for:
- Servers (use SSH)
- Production environments
- High-security scenarios
Troubleshooting
SSH Connection Issues
Problem: "Could not establish connection"
# Test SSH manually
ssh production-server

# Check SSH config
cat ~/.ssh/config

# Verbose SSH
ssh -v production-server
Problem: "Permission denied (publickey)"
# Generate new key
ssh-keygen -t ed25519 -C "your_email@example.com"

# Copy to server
ssh-copy-id user@server

# Or manually
cat ~/.ssh/id_ed25519.pub
# Paste into server's ~/.ssh/authorized_keys
Problem: Extensions not working remotely
1. Check VS Code version matches locally and remotely
2. Install extensions on remote: Extensions view → Filter: "@local" → Install on SSH
3. Reload window: Ctrl+Shift+P → "Developer: Reload Window"
Container Issues
Problem: Container fails to build
# Check Docker
docker ps

# View build logs
docker logs <container-id>

# Rebuild without cache
Ctrl+Shift+P → "Dev Containers: Rebuild Container"
Problem: Slow performance
// Use named volumes instead of bind mounts
{
  "mounts": [
    "source=node_modules,target=${containerWorkspaceFolder}/node_modules,type=volume"
  ]
}
WSL Issues
Problem: Slow file operations
✅ Move files to WSL filesystem:
   /home/user/projects (fast)

❌ Avoid:
   /mnt/c/Users/... (very slow)
Problem: "Cannot connect to WSL"
# Restart WSL
wsl --shutdown
wsl

# Update WSL
wsl --update
Pro Tips
Tip 1: Multi-Root Remote Workspaces
// myproject.code-workspace
{
  "folders": [
    {
      "name": "Frontend (Local)",
      "path": "./frontend"
    },
    {
      "name": "Backend (Remote)",
      "uri": "vscode-remote://ssh-remote+production-server/home/user/backend"
    }
  ]
}
Tip 2: Dotfiles Sync
Sync your shell config across remotes:
{
  "dotfiles.repository": "yourusername/dotfiles",
  "dotfiles.targetPath": "~/dotfiles",
  "dotfiles.installCommand": "~/dotfiles/install.sh"
}
Tip 3: Remote Extension Recommendations
In devcontainer.json:
{
  "customizations": {
    "vscode": {
      "extensions": [
        "dbaeumer.vscode-eslint",
        "GitHub.copilot",
        "eamodio.gitlens"
      ]
    }
  }
}
Tip 4: Custom Container Images
Use Dev Container images and features:
{
  "image": "mcr.microsoft.com/devcontainers/typescript-node:22",
  "features": {
    "ghcr.io/devcontainers/features/github-cli:1": {},
    "ghcr.io/devcontainers/features/docker-in-docker:2": {},
    "ghcr.io/devcontainers/features/node:1": {}
  }
}
Browse the full feature catalogue at containers.dev/features.
Tip 5: SSH Keep-Alive
Prevent SSH timeout:
# ~/.ssh/config
Host *
    ServerAliveInterval 60
    ServerAliveCountMax 3
Assessment
Knowledge Check
Question 1: What's the difference between Remote-SSH and Dev Containers?
Answer
- **Remote-SSH**: Connect to existing remote machine (server, VM, etc.). You control the environment. - **Dev Containers**: Create isolated, reproducible development environment using Docker. Same environment for all team members.Question 2: Why is WSL file performance better in /home vs /mnt/c?
Answer
- **/home**: Native Linux filesystem (ext4), full speed - **/mnt/c**: Windows filesystem accessed via translation layer, significant overhead (10-100x slower)Question 3: When should you use Remote Tunnels instead of SSH?
Answer
**Use Tunnels when:** - No SSH access/port forwarding available - Behind firewall/NAT - Need browser access (iPad, Chromebook)Use SSH when:
- You have SSH access
- Server/production environment
- Need full control
Practical Exercise
Setup Remote Development Environment:
-
Choose One:
- SSH to cloud VM
- Dev Container for local project
- WSL for Windows development
-
Configure:
- Install required extensions remotely
- Set up port forwarding
- Configure git
-
Develop:
- Clone a project
- Run development server
- Access via forwarded port
- Make changes, commit
-
Document:
- Create setup instructions
- Share devcontainer.json (if applicable)
Success Criteria:
- Connected to remote environment
- Extensions work correctly
- Web app accessible via port forwarding
- Git configured and working
- Team can replicate setup
Next Steps
- Debugging: Debugging in remote environments
- Task Automation: Automation for remote workflows
Additional Resources
Estimated Time: 4-5 hours Difficulty: Intermediate to Advanced Prerequisites: Introduction through Git Integration, Docker/SSH knowledge helpful