Git Integration Deep Dive
Learning Objectives
- Master VS Code's built-in Git interface
- Use GitLens for advanced Git visualisation
- Handle merge conflicts visually
- Implement Git workflows without touching the terminal
- Understand staging, committing, and branching in VS Code
- Configure Git for optimal VS Code experience
Core Concepts
VS Code Git Architecture
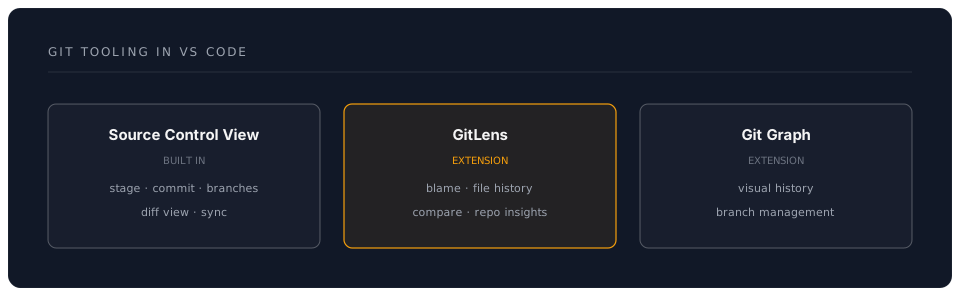
Built-in Git Features
Source Control View
Access:
Ctrl+Shift+G (Cmd+Shift+G on Mac)
Interface Components:
| Section | Purpose | Actions |
|---|---|---|
| Changes | Unstaged modifications | Stage, discard, view diff |
| Staged Changes | Ready to commit | Unstage, view diff |
| Commit Message | Commit description | Write message, commit |
| Branches | Branch management | Switch, create, merge |
Basic Git Operations
1. Viewing Changes
File Status Indicators:
M  = Modified (orange bar)
U  = Untracked (green bar)
D  = Deleted (red bar)
C  = Conflict (red exclamation)
View Diff:
- Click file in Changes → Side-by-side diff opens
- Ctrl+Shift+P → "Git: Open Changes"
Inline Diff:
{
"scm.diffDecorations": "all", // Shows change indicators in gutter
"scm.diffDecorationsGutterWidth": 4
}
2. Staging Files
Methods:
1. Click + next to file → Stage individual file
2. Click + next to "Changes" → Stage all
3. Right-click file → "Stage Changes"
4. Ctrl+Enter → Stage current file
Stage Hunks (Partial Staging):
1. Open file diff view
2. Hover over changed section
3. Click "Stage This Change" (+ icon)
4. Now only that section is staged
Example Use Case:
// You changed two things in one file:
// 1. Fixed a bug (want to commit)
// 2. Added debug console.logs (don't want to commit)

// Stage only the bug fix hunk!
3. Committing
Quick Commit:
1. Type commit message in box
2. Ctrl+Enter → Commit staged changes
3. Or click ✓ (checkmark) button
Commit Options:
Click ✓ dropdown:
- Commit (commits staged)
- Commit All (stages and commits all)
- Commit Staged (commits only staged)
- Commit Staged (Amend) → Amend last commit
Good Commit Message Template:
<type>: <subject>

<body>

<footer>
Example:
feat: add user authentication

- Implement JWT token generation
- Add login/logout endpoints
- Create auth middleware

Closes #123
Settings for Better Commits:
{
  "git.enableCommitSigning": true,
  "git.confirmSync": false,
  "git.autofetch": true,
  "git.enableSmartCommit": true, // Commit all when no staged changes
  "git.postCommitCommand": "none"
}
4. Branch Management
Create Branch:
1. Bottom left: Click branch name
2. Select "Create new branch"
3. Type branch name
4. Press Enter
Switch Branch:
1. Bottom left: Click branch name
2. Select branch to switch to
Branch from VS Code:
Ctrl+Shift+P:
- "Git: Create Branch"
- "Git: Checkout to..."
- "Git: Merge Branch"
- "Git: Rebase Branch"
- "Git: Delete Branch"
5. Push/Pull/Sync
Status Bar Git Actions:
Bottom left corner shows:
- Current branch
- ↑ Number of commits to push
- ↓ Number of commits to pull
Sync:
- Click ↻ (sync icon) → Pull then push
- Or: Ctrl+Shift+P → "Git: Sync"
Push/Pull Separately:
Ctrl+Shift+P:
- "Git: Push"
- "Git: Pull"
- "Git: Pull (Rebase)"
GitLens - Supercharged Git
Installation
code --install-extension eamodio.gitlens
Key Features
1. Inline Blame Annotations
See who changed each line:
Automatically appears at end of current line:
John Doe, 3 days ago • feat: add login feature
Configuration:
{
  "gitlens.currentLine.enabled": true,
  "gitlens.currentLine.pullRequests.enabled": true,
  "gitlens.hovers.currentLine.over": "line",
  "gitlens.hovers.currentLine.details": true
}
Hover for Details:
- Hover over blame annotation → Full commit details
- Shows: Author, date, commit message, files changed
2. File History
View File History:
1. Right-click file
2. "Open File History"
3. See all commits that touched this file
Or:
Click GitLens icon in sidebar → File History view
3. Line History
View specific line's history:
1. Place cursor on line
2. Right-click → "Open Line History"
3. See all commits that changed this line
4. Compare Views
Compare with:
Right-click file:
- Compare with HEAD
- Compare with Working Tree
- Compare with Previous Revision
- Compare with Branch/Tag/Ref
Compare Branches:
1. Click GitLens sidebar icon
2. "Compare" section
3. Choose two branches
4. See all differences
5. Repository Insights
Commit Graph:
GitLens → Commits view
Visual commit history with branches
Contributors:
GitLens → Contributors view
See who contributes most
File Blame:
Right-click file → "Toggle File Blame"
See blame for every line in gutter
Git Graph Extension
Installation
code --install-extension mhutchie.git-graph
Features
Visual Commit History:
1. Source Control view → Click "Git Graph" button
2. See interactive graph of all commits and branches
Actions in Git Graph:
- Click commit → View details
- Right-click commit → Cherry-pick, revert, reset
- Right-click branch → Merge, rebase, delete
- Drag branch to another → Merge/rebase visually
Configuration:
{
  "git-graph.showStatusBarItem": true,
  "git-graph.date.format": "ISO Date & Time",
  "git-graph.showCommitsOnlyReferencedByTags": false
}
Merge Conflict Resolution
Handling Conflicts Visually
When merge conflicts occur:
1. VS Code detects conflicts
2. Files marked with "C" in Source Control
3. Open conflicted file
4. VS Code shows visual conflict resolution
Conflict Markers:
<<<<<<< HEAD (Current Change)
const greeting = "Hello World";
=======
const greeting = "Hi Universe";
>>>>>>> feature-branch (Incoming Change)
Resolution Options:
Above each conflict, VS Code shows buttons:
- Accept Current Change
- Accept Incoming Change
- Accept Both Changes
- Compare Changes
Steps:
1. Click "Accept Current Change" (or other option)
2. Conflict markers removed automatically
3. Repeat for all conflicts in file
4. Save file
5. Stage file (conflict resolved)
6. Commit the merge
Compare Changes View:
Click "Compare Changes" →
Side-by-side view:
- Left: Current (HEAD)
- Right: Incoming (branch)
- Bottom: Result (edit manually)
Advanced Git Workflows
Feature Branch Workflow
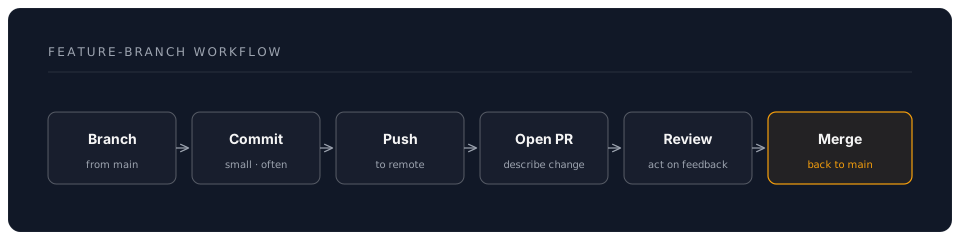
In VS Code:
1. Create branch: main → feature/new-feature
2. Make changes, commit frequently
3. Push: Click sync icon
4. Open PR: GitLens → "Create Pull Request"
5. Merge via GitHub (or GitLens extension)
Git Stash
Stash Changes:
Ctrl+Shift+P → "Git: Stash"
Or: Source Control view → "..." → "Stash"
Why Stash?
You're working on feature A
Urgent bug fix needed on main
Stash changes, switch to main, fix bug
Switch back to feature, apply stash
Apply Stash:
Ctrl+Shift+P → "Git: Apply Stash"
Choose stash from list
Stash with Message:
Ctrl+Shift+P → "Git: Stash (Include Untracked)"
Type message: "WIP: feature A half done"
Interactive Rebase
Rewrite Commit History:
1. GitLens → Commits view
2. Right-click commit → "Rebase to Here (Interactive)"
3. Choose action for each commit:
   - Pick (keep)
   - Squash (combine with previous)
   - Reword (change message)
   - Drop (remove)
Use Case:
Before PR, clean up messy commits:
- "WIP"
- "fix typo"
- "fix again"
- "actually fix it"

Squash into one clean commit:
- "feat: add user authentication"
Git Configuration for VS Code
Global Git Config
# Set name and email
git config --global user.name "Your Name"
git config --global user.email "your.email@example.com"

# Better diff algorithm
git config --global diff.algorithm histogram

# Reuse recorded conflict resolutions
git config --global rerere.enabled true

# Default branch name
git config --global init.defaultBranch main

# Auto-stash before rebase
git config --global rebase.autoStash true
VS Code Git Settings
{
  // Auto-fetch from remote
  "git.autofetch": true,
  "git.autofetchPeriod": 180, // seconds

  // Confirmations
  "git.confirmSync": false,
  "git.confirmForcePush": true,
  "git.allowForcePush": false,

  // Smart commit
  "git.enableSmartCommit": true,
  "git.smartCommitChanges": "all",

  // Branch protection
  "git.branchProtection": ["main", "master", "production"],

  // Diff editor
  "diffEditor.ignoreTrimWhitespace": false,
  "diffEditor.renderSideBySide": true,

  // Merge editor
  "merge-conflict.autoNavigateNextConflict.enabled": true
}
.gitignore in VS Code
Create .gitignore:
1. Create .gitignore file
2. Add patterns
3. VS Code respects it immediately
Common .gitignore for Node.js:
node_modules/
dist/
build/
.env
.env.local
*.log
.DS_Store
.vscode/settings.json  # If you don't want to share
GitIgnore Extension:
code --install-extension codezombiech.gitignore
Usage:
Ctrl+Shift+P → "Add gitignore"
Choose template (Node, Python, etc.)
Pro Tips
Tip 1: Commit from Anywhere
No need to open Source Control view:
Ctrl+Shift+P → "Git: Commit All"
Type message → Enter → Done!
Tip 2: Quick Branch Switching
Ctrl+Shift+P → Type branch name → Enter
No need to navigate through menus
Tip 3: View File on Remote
GitLens → Right-click file → "Open File on Remote"
Opens file on GitHub/GitLab in browser
Tip 4: Keyboard Shortcuts for Git
// keybindings.json
[
  {
    "key": "ctrl+g ctrl+c",
    "command": "git.commit"
  },
  {
    "key": "ctrl+g ctrl+p",
    "command": "git.push"
  },
  {
    "key": "ctrl+g ctrl+f",
    "command": "git.fetch"
  }
]
Tip 5: Timeline View
See file history inline:
1. Open file
2. Click "Timeline" in Explorer (bottom)
3. See all commits for this file
4. Click commit → View that version
Common Pitfalls
Pitfall 1: Committing Too Much
Problem: Staging node_modules or .env
Solution: Use .gitignore
1. Create .gitignore
2. Add: node_modules/
3. VS Code excludes from changes
Pitfall 2: Merge Conflicts Confusion
Problem: Don't understand conflict markers Solution: Use visual conflict resolution
Don't manually edit <<<< ==== >>>>
Use VS Code's "Accept Current/Incoming/Both" buttons
Pitfall 3: Lost Work After Reset
Problem: git reset --hard loses changes
Solution: Stash instead
Never: Reset to discard changes
Always: Stash or commit to temp branch
Pitfall 4: Force Push to Protected Branch
Problem: Accidentally force push to main Solution: Enable branch protection
{
  "git.branchProtection": ["main", "master"],
  "git.allowForcePush": false
}
Pitfall 5: Not Using GitLens Features
Problem: Missing powerful history tools Solution: Learn GitLens shortcuts
- Hover any line → See last change
- Right-click file → File History
- GitLens sidebar → Explore repository
Assessment
Knowledge Check
Question 1: How do you stage only part of a file's changes?
Answer
1. Open file in diff view 2. Hover over changed section (hunk) 3. Click "Stage This Change" (+ icon) 4. Only that hunk is stagedQuestion 2: What's the difference between "Commit" and "Commit All"?
Answer
- **Commit**: Commits only staged changes - **Commit All**: Stages ALL changes, then commits them (if smartCommit is enabled)Question 3: How do you view who last modified a specific line?
Answer
With GitLens installed: - Inline blame appears at end of line - Or: Right-click line → "Open Line History" - Or: Hover over line → Blame annotation showsPractical Exercise
Complete Git Workflow:
-
Create Feature Branch:
- From main, create branch: feature/user-profile
- Make 3 commits with good messages
-
Handle Conflict:
- Switch to main, make overlapping change
- Switch back to feature, merge main
- Resolve conflict visually
- Complete merge
-
Clean History:
- Interactive rebase to squash commits
- Create single clean commit
- Push to remote
-
Create PR:
- Use GitLens to create PR
- Review diff before submitting
Success Criteria:
- Clean commit history (1-3 commits max)
- All conflicts resolved
- Good commit messages
- PR created successfully
Next Steps
Master Git in VS Code, ready for:
- Remote Development: Remote workflows with Git
- Task Automation: Build systems and Git hooks
Additional Resources
Estimated Time: 4 hours Difficulty: Intermediate Prerequisites: Basic Git knowledge