Introduction to VS Code as an AI-Powered IDE
Learning Objectives
By the end of this module, you will:
- Understand VS Code's architecture and why it's become the universal development platform
- Install and configure VS Code for optimal performance
- Navigate the interface confidently using both mouse and keyboard
- Understand how AI extensions transform VS Code into an intelligent coding partner
- Set up your first AI-enhanced development environment
Why VS Code in 2026?
Visual Studio Code has evolved from a code editor into the universal platform for knowledge work. Here's why it dominates:
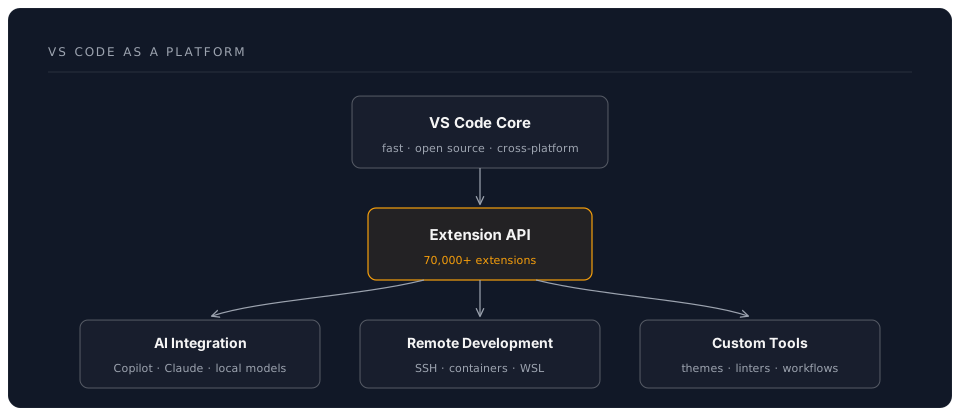
Market Dominance (2026 Stats)
- 73.7% of professional developers use VS Code
- 50+ million active users globally
- 2.5+ million extension downloads daily
- #1 rated editor on Stack Overflow for 7 consecutive years
Core Concepts
1. The VS Code Philosophy
VS Code follows three core principles:
Principle 1: Extensibility First
Core Editor (20 MB) + Extensions (Your Choice) = Perfect Tool
Unlike traditional IDEs that bundle everything, VS Code lets you build exactly what you need.
Principle 2: Remote-First Architecture Your code can live anywhere—local machine, remote server, container, cloud VM—while you edit seamlessly.
Principle 3: AI-Native Design Modern VS Code is built for AI collaboration, not just text editing.
2. Architecture Overview
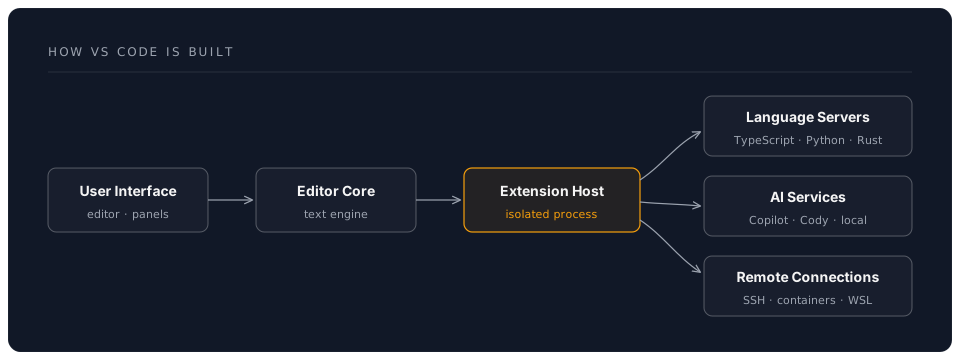
3. Key Components
| Component | Purpose | Why It Matters |
|---|---|---|
| Editor | Text editing with IntelliSense | Where you write code |
| Explorer | File/folder navigation | Project organisation |
| Source Control | Git integration | Version control without CLI |
| Extensions | Add functionality | Customise everything |
| Terminal | Command line access | No context switching |
| Remote | Code anywhere | Consistent environment |
Hands-On: Installation and Setup
Exercise 1: Install VS Code
Windows:
# Using winget
winget install Microsoft.VisualStudioCode

# Or download from https://code.visualstudio.com
macOS:
# Using Homebrew
brew install --cask visual-studio-code

# Or download from https://code.visualstudio.com
Linux (Ubuntu/Debian):
sudo apt update
sudo apt install wget gpg
wget -qO- https://packages.microsoft.com/keys/microsoft.asc | gpg --dearmor > packages.microsoft.gpg
sudo install -D -o root -g root -m 644 packages.microsoft.gpg /etc/apt/keyrings/packages.microsoft.gpg
sudo sh -c 'echo "deb [arch=amd64,arm64,armhf signed-by=/etc/apt/keyrings/packages.microsoft.gpg] https://packages.microsoft.com/repos/code stable main" > /etc/apt/sources.list.d/vscode.list'
rm -f packages.microsoft.gpg
sudo apt update
sudo apt install code
✅ Verification:
code --version
# Should output: 1.96.x or higher
Exercise 2: First Launch and Interface Tour
Launch VS Code:
# From terminal
code

# Open specific folder
code /path/to/your/project

# Open current directory
code .
Interface Layout:
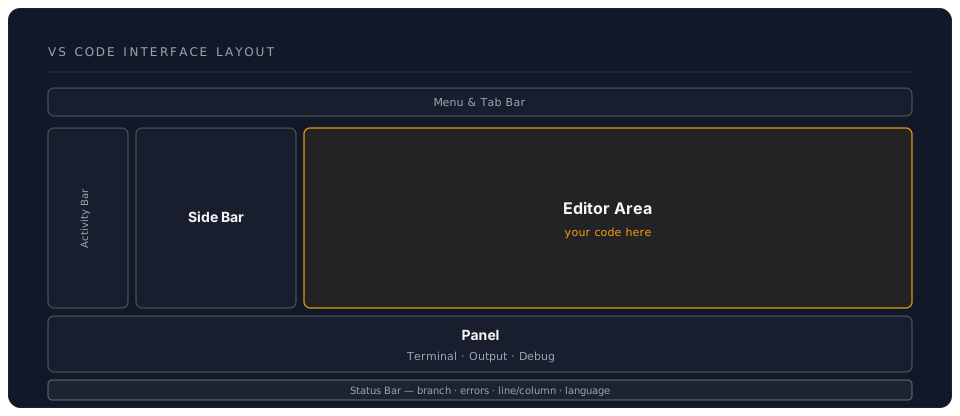
Key UI Elements:
-
Activity Bar (Left edge):
- Explorer: Files and folders
- Search: Find across files
- Source Control: Git operations
- Run & Debug: Debugging tools
- Extensions: Install add-ons
-
Side Bar (Dynamic based on Activity Bar selection)
-
Editor Area (Center):
- Tabbed interface
- Split editors
- Code editing
-
Panel (Bottom):
- Integrated terminal
- Output logs
- Problems list
- Debug console
-
Status Bar (Bottom edge):
- Git branch
- Errors/warnings
- Line/column position
- Language mode
- Encoding
Exercise 3: Essential First Settings
Access Settings:
- Menu:
File > Preferences > Settings(Windows/Linux) - Menu:
Code > Preferences > Settings(macOS) - Keyboard:
Ctrl+,(Windows/Linux) orCmd+,(macOS)
Recommended Initial Settings (settings.json):
{
  // Editor
  "editor.fontSize": 14,
  "editor.fontFamily": "'Fira Code', 'Cascadia Code', Consolas, monospace",
  "editor.fontLigatures": true,
  "editor.lineHeight": 22,
  "editor.tabSize": 2,
  "editor.insertSpaces": true,
  "editor.wordWrap": "on",
  "editor.minimap.enabled": true,
  "editor.rulers": [80, 120],

  // AI-friendly settings
  "editor.inlineSuggest.enabled": true,
  "editor.suggestSelection": "first",
  "editor.quickSuggestions": {
    "other": true,
    "comments": true,
    "strings": true
  },

  // Files
  "files.autoSave": "onFocusChange",
  "files.trimTrailingWhitespace": true,
  "files.insertFinalNewline": true,

  // Terminal
  "terminal.integrated.fontSize": 13,
  "terminal.integrated.fontFamily": "monospace",

  // Appearance
  "workbench.colorTheme": "Dark+ (default dark)",
  "workbench.iconTheme": "vs-seti",
  "workbench.startupEditor": "welcomePage"
}
To edit settings.json directly:
- Open Command Palette:
Ctrl+Shift+P/Cmd+Shift+P - Type:
Preferences: Open User Settings (JSON) - Paste configuration above
Exercise 4: Install Essential Extensions
Method 1: Via UI
- Click Extensions icon in Activity Bar (
Ctrl+Shift+X) - Search for extension name
- Click "Install"
Method 2: Via Command Line
# Install multiple extensions at once
code --install-extension ms-vscode.vscode-typescript-next
code --install-extension dbaeumer.vscode-eslint
code --install-extension esbenp.prettier-vscode
code --install-extension eamodio.gitlens
code --install-extension ms-python.python
code --install-extension ms-vscode-remote.remote-ssh
Starter Extension Pack:
| Extension | Purpose | Why Install |
|---|---|---|
| GitLens | Enhanced Git | See blame, history inline |
| Prettier | Code formatter | Consistent style |
| ESLint | JavaScript linter | Catch errors early |
| Python | Python support | Essential for Python |
| Remote - SSH | Remote editing | Code on servers |
| Path Intellisense | Path autocomplete | Faster file references |
| Bracket Pair Colorizer | Colourise brackets | Visual nesting |
| Error Lens | Inline errors | See issues immediately |
AI Integration Basics
Exercise 5: Understanding AI in VS Code
Modern VS Code supports three types of AI integration:
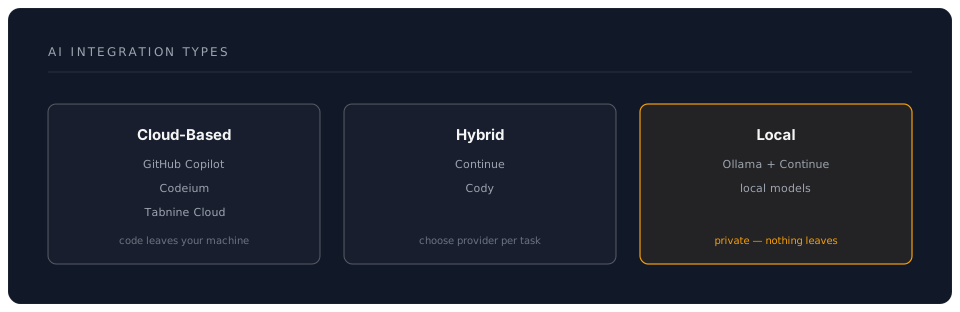
Cloud-Based AI:
- Pros: Most powerful models, always up-to-date, no local resources
- Cons: Requires internet, subscription costs, privacy concerns
- Examples: GitHub Copilot ($10/month), Codeium (free tier)
Hybrid AI:
- Pros: Choose your model, flexible pricing, some offline capability
- Cons: Setup complexity, may need API keys
- Examples: Continue.dev, Cody
Local AI:
- Pros: Complete privacy, no subscription, works offline
- Cons: Requires GPU, slower than cloud, limited models
- Examples: Ollama + Continue
Exercise 6: Quick AI Setup (GitHub Copilot)
Step 1: Install GitHub Copilot
code --install-extension GitHub.copilot
code --install-extension GitHub.copilot-chat
Step 2: Authenticate
- Click Copilot icon in status bar
- Sign in with GitHub account
- Authorise VS Code
Step 3: Test It
Create a new file test.js:
// Type this comment and wait:
// Function to calculate fibonacci sequence

// Copilot should suggest the implementation!
Copilot Features:
- Inline suggestions: As you type (press
Tabto accept) - Chat: Ask questions (
Ctrl+Ior sidebar) - Explain code: Highlight code, right-click > "Copilot: Explain This"
- Generate tests: Right-click > "Copilot: Generate Tests"
Pro Tips and Shortcuts
Essential Keyboard Shortcuts
Must-Know Shortcuts:
| Action | Windows/Linux | macOS | Purpose |
|---|---|---|---|
| Command Palette | Ctrl+Shift+P | Cmd+Shift+P | Access all commands |
| Quick Open | Ctrl+P | Cmd+P | Open files by name |
| Toggle Terminal | `Ctrl+`` | `Cmd+`` | Show/hide terminal |
| Settings | Ctrl+, | Cmd+, | Open settings |
| Extensions | Ctrl+Shift+X | Cmd+Shift+X | Manage extensions |
| Find | Ctrl+F | Cmd+F | Find in file |
| Replace | Ctrl+H | Cmd+H | Find and replace |
| Save All | Ctrl+K S | Cmd+K S | Save all files |
Pro Tips
Tip 1: Command Palette is Your Friend
Ctrl+Shift+P → Type what you want to do
Examples:
- "reload" → Reload window
- "theme" → Change color theme
- "format" → Format document
Tip 2: Zen Mode for Focus
View > Appearance > Zen Mode (or Ctrl+K Z)
Removes ALL UI distractions
Tip 3: Quick File Navigation
Ctrl+P → Start typing filename
  - Add ":" for line number: "file.js:42"
  - Add "@" for symbols: "@functionName"
  - Add "#" for workspace search
Tip 4: Multi-Cursor Editing
Alt+Click → Add cursor
Ctrl+Alt+↑/↓ → Add cursor above/below
Ctrl+D → Select next occurrence
Common Pitfalls to Avoid
Pitfall 1: Not Using Workspaces
Problem: Opening individual files loses context Solution: Always open folders/workspaces
# Don't do this:
code file1.js file2.js

# Do this:
code /path/to/project
Pitfall 2: Ignoring Settings Sync
Problem: Losing configuration when switching machines Solution: Enable Settings Sync early
File > Preferences > Turn on Settings Sync
Sign in with GitHub/Microsoft account
Pitfall 3: Installing Too Many Extensions
Problem: Slow startup, conflicts Solution: Use profiles for different workflows (covered in the Profiles & Sync workshop)
Pitfall 4: Not Learning Keyboard Shortcuts
Problem: Inefficient mouse-heavy workflow Solution: Learn 3 new shortcuts per week
Help > Keyboard Shortcuts Reference
Print it, keep it visible
Pitfall 5: Ignoring the Integrated Terminal
Problem: Context switching to external terminal Solution: Use built-in terminal (`Ctrl+``)
# Multiple terminals
Ctrl+Shift+` → New terminal
Ctrl+PageDown/PageUp → Switch terminals
Assessment Questions
Knowledge Check
Question 1: Architecture Understanding Which component allows VS Code to support remote development?
- A) The editor core
- B) The extension host
- C) The language server protocol
- D) The remote development extensions
Answer
D) The remote development extensions. While the extension host enables extensibility, the actual remote development capability comes from specific extensions (Remote-SSH, Remote-Containers, etc.) that leverage VS Code's architecture.Question 2: AI Integration What are the three types of AI integration in VS Code?
Answer
1. Cloud-based (GitHub Copilot, Codeium) 2. Hybrid (Continue, Cody with choice of models) 3. Local (Ollama + Continue, local models)Question 3: Settings Management Where are user settings stored in VS Code?
- A) In the VS Code installation directory
- B) In the workspace folder
- C) In your user profile directory
- D) In the cloud only
Answer
C) In your user profile directory - Windows: `%APPDATA%\Code\User\settings.json` - macOS: `~/Library/Application Support/Code/User/settings.json` - Linux: `~/.config/Code/User/settings.json`Practical Exercise
Exercise: Set Up Your Development Environment
- Install VS Code
- Install these extensions:
- GitLens
- Prettier
- Error Lens
- One AI assistant (Copilot or Cody)
- Configure your settings.json with:
- Font size you prefer
- Auto-save enabled
- Tab size of 2 spaces
- Create a test project folder
- Open integrated terminal and run:
git init - Create a README.md file
- Test AI suggestions by writing a comment describing a function
Success Criteria:
- VS Code launches without errors
- All extensions installed and active
- Terminal works and shows correct directory
- AI suggestions appear when typing
- File explorer shows your project structure
Next Steps
You've completed the foundation! Next up:
- Keyboard Shortcuts: Essential shortcuts for 10x productivity
- Extension Ecosystem: Deep dive into the marketplace
- Settings & Customisation: Advanced configuration
Additional Resources
Official Documentation:
- VS Code Docs - Comprehensive official docs
- VS Code Tips and Tricks - Official tips
- Keyboard Shortcuts PDF - Printable reference
Video Tutorials:
- VS Code Crash Course (YouTube) - Visual learners
- VS Code Can Do That? - Feature highlights
Community:
- VS Code Reddit - Community discussions
- VS Code GitHub - Source code and issues
- Stack Overflow Tag - Q&A
Estimated Time to Complete: 2-3 hours Difficulty: Beginner Prerequisites: None